Posts

Showing posts with the label Python

Add sensors and output to your PC using the Pico 2040 with custom firmware Desktop Python and Blinka

Image
Extend your PC into the microcontroller sensor and control realm with Desktop Python Adafruit Blinka and an RP2040 Pico running U2IF firmware. This setup gives you access to the microcontroller component libraries without writing code on the microcontroller itself. No code-download-run cycle is required! Normally, when you want to run some motors, read some sensors, or talk to some small displays, attach those elements to a microcontroller running your custom software. Adafruit has made it so that their libraries work with a couple of non-programmable port expanders.  You run standard Python on your PC using their libraries.  The Adafruit Blinka software has embedded drivers for boards that present the correct USB HID interfaces.  Two examples are the MCP2221A and FTDI breakout expander boards. There is open-source U2IF Pico 2040 firmware that turns an RP2040 into an appliance that can be talked to as a HID device.  You can use the same Adafruit Blinka software to ta...

The simplest micro benchmark for cupy CUDA containerized in NVIDIA AI Workbench

Image
NVIDIA AI Workbench runs inside a containerized environment, and I wanted an environment check that verifies the container has access and that Docker/podman, the NVIDIA driver, and Workbench are all on compatible versions.   Containerization has no effect on performance. The CUDA code is pretty much a direct pass-through to the card. Environment NVIDIA AI Workbench One local GPU Windows 11  Docker Desktop Program running in a container built by the Workbench based on the PyTorch/Cuda image Program I access the containerized environment via a Jupyter Notebook visible to the browser on the Windows machine. This is a snapshot of the Jupyter Notebook. numpy_cupy_sort.ipynb Gist It found a problem The program demonstrated that there was a container adapter (or something) mismatch that recently happened.  cupy returned that it had access to the GPU. It turns out that it really did not, and that a Docker Desktop upgrade was needed to fix something driver-related.  The ...

entitopia - a Python tool that for loading, customizing and automating indexes and data loads into Elasticsearch

Image
ElasticSearch is an awesome extensible text search engine. It provides methods for loading data, customizing the data, applying analyzers, changing search weightings, and enriching data by merging subsets of multiple datasets. We can merge pieces of different datasets (indexes) into customized indexes to meet our data analysis needs.  We want to do all of that in a repeatable and automatable fashion with some level of flexibility.  The Python code lets us define pipelines that support multiple steps and customized operations.   This diagram shows a 3-step pipeline that represents data being loaded into two indexes (1,3) with an enrichment and resource manipulation step (2). Each step is driven from a config file that describes the phase processors and other configuration information.  {     "steps" : [         {             "name" : "doctors-clinicians" ,             "phase...

Python Logging in Color

Image
Every Python programmer still using print statements should up their game and migrate to the Python logging module. That module lets you filter output based on severity settings, lets you send the output to different destinations, and lets you format and structure your output.   This formatting ability lets us create more regular and human-readable output.  A classic developer experience use case for this is to color code the output by severity level.  The following output shows 3 different logging levels in three different colors, INFO, WARNING and CRITICAL. The same output also shows an arrangement that includes: time formatting, module name, level and a logging message. Show me the code! We only need 2 lines of code     root_logger = logging . getLogger ()     CustomFormatter (). replace_formatter (root_logger) when we use this class derived from a thread on stackoverflow  and other places. import logging class CustomFormatter ( logging...

Belay - Interface with hardware from your PC from within a single Python program

Image
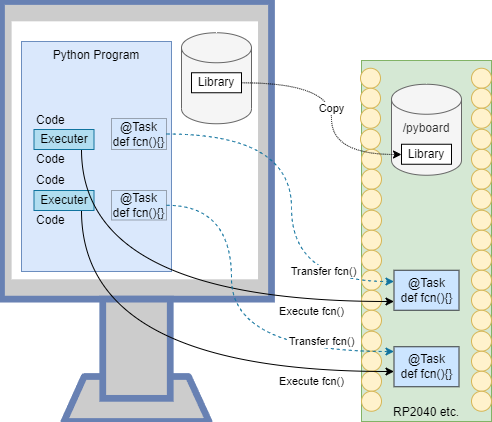
Belay lets you write and run Python code on a host like PC and execute pieces of that code down on a connected microcontroller from inside your host Python session.  You write python code and mark up which code will run on the microcontroller (MCU).  The rest of the code runs on the host.  At runtime Belay will transfer the MCU targeted code down to the microcontroller.  The host Python code can then call that downloaded MCU based code as if it were running locally.  MicroPython CircuitPython and host Python Belay runs on Python3 on the host. It can download and interact with MicroPython or CircuitPython runtimes on the microcontroller. Belay GitHub repository Read the Docs: How Belay works MicroPython CircuitPython Code on both the Host and the Microcontroller Belay Python examples on GitHub All the Python code starts on the PC on the left. For this example, everything is in one file like the led flasher above. Both PC and MCU code is in the same Python source ...

Shrinking an IP address to fit on the PCD8544 Nokia 5110 style LCD - MicroPython Example

Image
LCD status displays can really simplify troubleshooting IoT devices.  I need to know the IP address of the device. and MDNS doesn't always work for me.  I could log into my router to find the IPs of my devices but it is simpler to add a cheap display and log the IP address on the display.  I have a pile of cheap Nokia-style modules that are 84 pixels x 48 pixels. The Adafruit Python driver defaults to a 5x8 font which results in 6x10 dot character spacing. 5 lines at 10 pixels tall is more than 48 pixels but we don't need the last two padding rows because there is nothing below them. That turns out to be 14 characters on the 5110-style LCD.  IP addresses can be 15 characters if all 5 octets are 3 decimal digits. This means it is possible to lose the last character of an IP address as shown below. The separator characters don't need to be full fixed-width characters. We know they can be smaller than the digits used for the IP address octets.  The function down be...

Working with state in MicroPython Timer callbacks

Image
MicroPython supports hardware and software timers with callbacks. Timers can be configured as single-shot or periodic events meaning they trigger only once or on a periodic basis. You can bind a Python function to the timer running in either mode.  Your function will receive a  callback  whenever the timer rolls over or expires.  Hardware timers are bound to the actual CPU timers and typically correlate 1:1 to hardware devices.  This means the hardware timer configuration is hardware specific to the size and capabilities of the hardware timers.  In general, you can only tie one callback to each timer because the callback is bound to the hardware timer interrupt handler.   MicroPython also supports software timers. Software timers are the only option on CPUs like the ESP8266 where hardware timers are scarce or are dedicated to other functions. They have the same callback/handler restrictions as hardware timers. Video Content YouTube:  Working ...

Running timed background tasks on IoT devices the easy way with MicroPython

Image
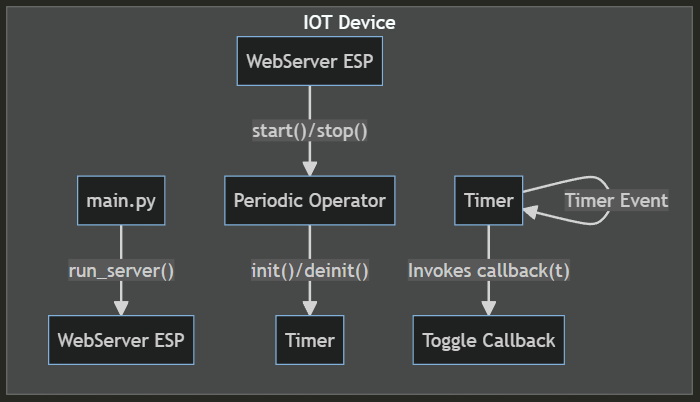
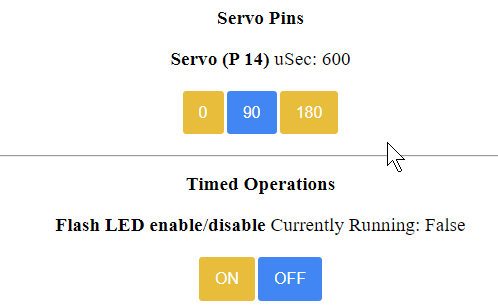
MicroPython is single-threaded but it turns out it is easy to have it do periodic tasks while doing other work like waiting on network requests when running a web server. Here we demonstrate a simple wrapper class that makes it trivial to trigger actions with a timer while at the same time accepting web requests. Everything discussed here runs on a simple ESP8266 IOT board. The code is on Github https://github.com/freemansoft/ESP8266-MicroPython Web Server gives direct control and enables Timed Events The IoT device runs a small web server written in MicroPython.   It coughs up a web page with a series of device controls.  This image contains a direct servo pin control and a timed operations control.  The latter basically causes some action to be taken on a regular basis, in this case flashing an LED.  This happens continually while the system waits for and receives HTTP requests on this UI. We can move the servo around while the light flashes without any com...

Dependency Injection - locally testing a Python IoT component

Image
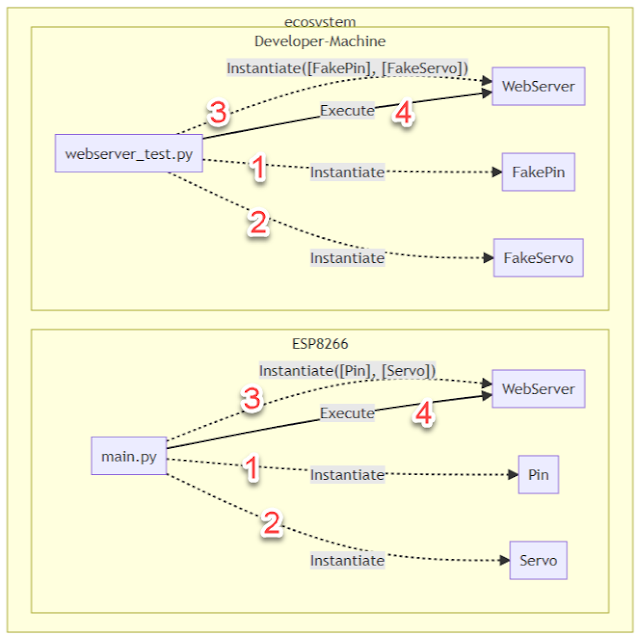
Dependency Injection is a method of reducing coupling by removing the knowledge of where how that component's dependencies are created.  The dependencies required in a component are provided to it rather than created by it.  Removing this coupling lets us change the nature of the things a component relies on.  In the case of this example: a hardware-specific dependency can be swapped with a virtual hardware version for testing or for alternative uses. References Sample Code:  https://github.com/freemansoft/ESP8266-MicroPython Video Discussion:  https://youtu.be/cHM4FydObmw Summary View Our code contains two different entry points.   On the IoT device, main.py is the actual IoT based entry point.   main.py  can configure I/O pins based on some configuration information. It can then do the same for Servo pins.  Finally, the main.py initializes a web server passing in the configured I/O and Servo pins. On our development machine or any...