Posts

Showing posts with the label CircuitPython

Exercising the DeskPi PicoMate - Pico 2040 kit

Image
The PicoMate is a well-thought-out experimenter's kit that provides 11 devices that can be attached and used by a Raspberry Pico 2040. It is a breadboard / clip-apart type of configuration.  The sensors and outputs come attached to the Pico as part of a snap-apart experimenter board. You can use the board as-is or break off the sensors and emitters and use them connected via JST cables.  They normally cost $40-$60.  I found mine for $15 on closeout at Microcenter. I should have bought more. This rest of this page is more of a Reference and less of User Guide The PicoMate The PicoMate includes these devices and features. All modules are pre-wired, no soldering and wiring are required and out-of-box 12 detachable and easy-to-use modules: Push Button WS2812 RGB LED Rotary Encoder Buzzer Digital Microphone (ZTS6531S) Digital PIR Sensor (AS312) 6-Axis IMU Sensor (LSM6DS3TR-C) Digital Optical Sensor (LTR-381RGB-01) 3-Axis Magnetometer (MMC5603NJ) Temperature & Humidity Sens...

CircuitPython automatically routes REPL output to your OLED Display

Image
I ran into this weird problem when using an OLED display on a Pico RP2040 when I initialized the Adafruit SH1106 SPI OLED driver.  Trash started scrolling up the screen.  The screen was erased and worked fine when sending my own graphics to it.   Finally, I looked at the output and found out Adafruit automatically routes REPL output to any display added. Video A second try at a video The first video #CircuitPython2023 Revision History 2023 03 Created

Controlling output using Adafruit Logger in CircuitPython

Image
Print statements are the standard debugging and tracing tool for programs running on microcontrollers in non-real-time sections of code. Print statements are a great tool to generate basic output as long as you always  want the output and always  want the output to go to a serial port.   Use the logger if you want to be able to turn print statements on and off without having to continually re-comment and de-comment them. The Adafruit logging library lets you throttle your log output reducing the amount generated. It lets categorize your logging criticality with levels like DEBUG, INFO, WARN, ERROR, etc.  The logger then lets you set the minimum level of criticality for messages to actually be emitted.  If you set your filter level at WARN then no DEBUG or INFO messages show up in the logs/console. This can speed up an application and reduce resource usage while retaining the ability to enable more information if you need it.  The logging library also l...

Trinkey Neo - Updated CircuitPython lights and keys #CircuitPython2023

Image
Did you wish you had a flashier sample CircuitPython capacitive touch program for the Adafruit Trinkey Neo?  That's great because I've got one here.  This upgraded program lets you know that the unit is running and when you've actually touched the capacitive sensor. I started with https://learn.adafruit.com/adafruit-neo-trinkey/capacitive-touch-neopixel-brightness and ended up with the listing below. Video Watch the video to see it in action. Sample Program This Python code is somewhere in this GitHub repository  https://github.com/freemansoft/Adafruit-Trinkey-CircuitPython # SPDX-FileCopyrightText: 2021 Kattni Rembor for Adafruit Industries # # SPDX-License-Identifier: MIT # # updated by freemansoft to include flashing and touch activated colors # originall from https://learn.adafruit.com/adafruit-neo-trinkey/capacitive-touch-hid """CircuitPython Capacitive Touch HID Example for Neo Trinkey""" import time import board import touchi...

Belay - Interface with hardware from your PC from within a single Python program

Image
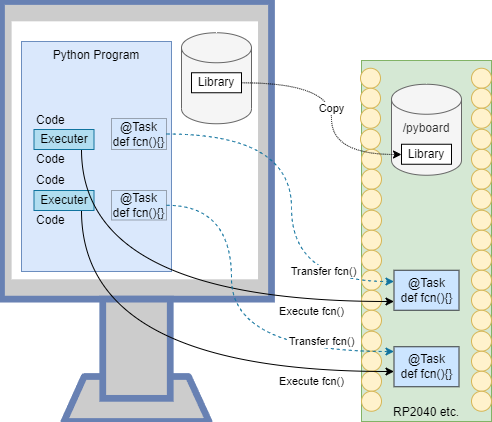
Belay lets you write and run Python code on a host like PC and execute pieces of that code down on a connected microcontroller from inside your host Python session.  You write python code and mark up which code will run on the microcontroller (MCU).  The rest of the code runs on the host.  At runtime Belay will transfer the MCU targeted code down to the microcontroller.  The host Python code can then call that downloaded MCU based code as if it were running locally.  MicroPython CircuitPython and host Python Belay runs on Python3 on the host. It can download and interact with MicroPython or CircuitPython runtimes on the microcontroller. Belay GitHub repository Read the Docs: How Belay works MicroPython CircuitPython Code on both the Host and the Microcontroller Belay Python examples on GitHub All the Python code starts on the PC on the left. For this example, everything is in one file like the led flasher above. Both PC and MCU code is in the same Python source ...

Microcontroller - service connections and acquisition patterns

Image
I ended up with some crosscutting content when I wrote up some patterns for getting data onto and off of microcontrollers. The consumption and generation patterns are cross-matched with implementation details.  You may know where you want to send data or in how many directions you want to send data. Now you have other concerns.  Connecting the devices, triggering transfers, and balancing latency with overhead. The next step is to understand how you are going to handle the connectivity and connection initiation.  That depends on the connection types, network topologies, and tools you have.  You then need to figure out how you are going to know when to capture data or receive commands.  Is it time-based or event-based?   Then you need to understand what your payloads look like and balance that against CPU, latency, and other constraints. This was just a subset but should give you the idea. Related Video Moving IOT data onto the controller Moving IOT data...

Work with IoT devices on a standard computer using CircuitPython and the Adafruit MCP2221 breakout board

Image
The MCP2221 and FTD2302 are breakout boards that have a USB on one side and a series of structured and unstructured I/O pins on the other. The breakout boards have various GPIO, I2C other pins on them that you attach sensors, LEDs, or other components.  This lets you indirectly attach GPIO inputs and outputs to a regular computer.   Adafrut's CircuitPython Blinka library emulates the CircuitPython IOT  board interface that is the root of many of the Circuitpython distributions.  That interface sits between standard Python and computer-attached I/O devices.  It was originally designed to support the I/O pins of the Linux-based Raspberry Pi. In our case, it sits between standard Python and the I/O devices that exist on the other sides of the MCP2221 and FTD2302 breakout boards. The Stack Python Program Python 3.x Runtime CircuitPython Framework Circuit Python Blinka board adapter Breakout Board Definition Individual Drivers...

Shrinking an IP address to fit on the PCD8544 Nokia 5110 style LCD - MicroPython Example

Image
LCD status displays can really simplify troubleshooting IoT devices.  I need to know the IP address of the device. and MDNS doesn't always work for me.  I could log into my router to find the IPs of my devices but it is simpler to add a cheap display and log the IP address on the display.  I have a pile of cheap Nokia-style modules that are 84 pixels x 48 pixels. The Adafruit Python driver defaults to a 5x8 font which results in 6x10 dot character spacing. 5 lines at 10 pixels tall is more than 48 pixels but we don't need the last two padding rows because there is nothing below them. That turns out to be 14 characters on the 5110-style LCD.  IP addresses can be 15 characters if all 5 octets are 3 decimal digits. This means it is possible to lose the last character of an IP address as shown below. The separator characters don't need to be full fixed-width characters. We know they can be smaller than the digits used for the IP address octets.  The function down be...