Adding cheap LCD display and bluetooth shields to a Netduino
I purchased a cheap LCD keypad shield from DX that makes it simple to add a 16x2 LCD display to an Arduino. The board also includes a set of buttons that are connected to a single analog pin through a resistor ladder network. It's a pretty slick way of minimizing the pin count. The board is designed for 5V. The Netduino is a 3.3v system.
The buttons resistor network is wired to the 5V supply so most of the buttons analog values are out of bounds for the 3.3V input. Others have modified the board to use the 3.3v rail or dropped 5V to 3.3V through a resistor. I didn't do any of this because I don't need the buttons.
The LCD uses digital pins D4-D9 and can operate with 3.3V signals. The Netduino MF libraries support the on-board devices but not external chips or interfaces. The LCD Controller is a standard HD44780 which is supported by nice netmftoolbox supplemental library. I downloaded the netmftoolbox library from codeplex and unpacked into a 3rd party directory I keep on my dev machine. I then added two netmftoolbox DLLs to my Visual Studio project using the instructions on the netmftoolbox wiki.
This program builds on the Bluetooth Shield code from a previous post. It assumes you have connected to the Netduino over Bluetooth Serial and can send commands to the Bluetooth module using something like putty.exe on a Windows machine. Mac/linux users can use their built in tools. The program echos anything sent to the LCD and back to the sending machine. Note that the HD44780 thinks it has a 40 character display no matter what you tell the library so it will fill the display memory for columns 0-39 before wrapping to the next line. The code supports a couple special characters to move the cursor to the beginning of the first line or the second line so that you don't have to blindly type off screen.
The buttons resistor network is wired to the 5V supply so most of the buttons analog values are out of bounds for the 3.3V input. Others have modified the board to use the 3.3v rail or dropped 5V to 3.3V through a resistor. I didn't do any of this because I don't need the buttons.
The LCD uses digital pins D4-D9 and can operate with 3.3V signals. The Netduino MF libraries support the on-board devices but not external chips or interfaces. The LCD Controller is a standard HD44780 which is supported by nice netmftoolbox supplemental library. I downloaded the netmftoolbox library from codeplex and unpacked into a 3rd party directory I keep on my dev machine. I then added two netmftoolbox DLLs to my Visual Studio project using the instructions on the netmftoolbox wiki.

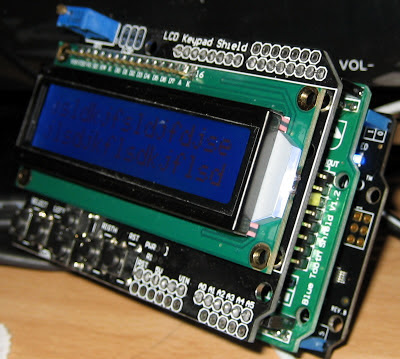
Note the mounting hole offset on the LCD shielddue to the offset headers on the Bluetooth shield.
This program builds on the Bluetooth Shield code from a previous post. It assumes you have connected to the Netduino over Bluetooth Serial and can send commands to the Bluetooth module using something like putty.exe on a Windows machine. Mac/linux users can use their built in tools. The program echos anything sent to the LCD and back to the sending machine. Note that the HD44780 thinks it has a 40 character display no matter what you tell the library so it will fill the display memory for columns 0-39 before wrapping to the next line. The code supports a couple special characters to move the cursor to the beginning of the first line or the second line so that you don't have to blindly type off screen.
using System;
using System.Text;
using System.Threading;
using Microsoft.SPOT;
using Microsoft.SPOT.Hardware;
using SecretLabs.NETMF.Hardware;
using SecretLabs.NETMF.Hardware.Netduino;
using System.IO.Ports;
using Toolbox.NETMF.Hardware;

///
/// This code is described at http://joe.blog.freemansoft.com
/// Serial code was derived from http://blog.codeblack.nl/post/NetDuino-Getting-Started-with-RS232.aspx
///
/// This uses uses netmftoolbox available on codeplex.  It is a pretty slick contributed library.
/// Documentation on how to use it is available at http://netmftoolbox.codeplex.com/
/// http://netmftoolbox.codeplex.com/wikipage?title=How%20to%20use%20the%20classes%3f&referringTitle=Documentation
///
/// The Hd44780LCD controller actually has a 40 character wide buffer so we will just write
/// into the extra space if we write off the edge of the 16character LCD.  So line overflow
/// doesen't wrap to display boundry. A real program would know what it was writing and where cursor was.
///

namespace Netduino_COM2_Echo
{
    public class Program
    {
        static SerialPort serial;
        static Hd44780Lcd display;

        public static void Main()
        {
            initialize_SerialPort();
            initialize_LcdPanel();
            tellUser_WeAreReady();

            // we can toggle the LED including Sleep() because we use an event handler to handle input
            OutputPort led = new OutputPort(Pins.ONBOARD_LED, false);
            while (true)
            {
                led.Write(true);
                Thread.Sleep(250);
                led.Write(false);
                Thread.Sleep(250);
            }
        }

        static void serial_DataReceived(object sender, SerialDataReceivedEventArgs e)
        {
            // create a single byte array
            byte[] bytes = new byte[1];

            // as long as there is data waiting to be read
            while (serial.BytesToRead > 0)
            {
                // read a single byte
                serial.Read(bytes, 0, bytes.Length);
                // send the same byte back
                serial.Write(bytes, 0, bytes.Length);
                // just some kludgy code to show cursor management
                // there isn't any way to know where the cursor currently is
                if (bytes[0] == 0xd)
                {
                    // lets just use CR to go to the home position
                    display.ChangePosition(0, 0);
                }
                else if (bytes[0] == 0xa)
                {
                    // lets use LF to go to 2nd line home position
                    display.ChangePosition(1, 0);
                }
                else if (bytes[0] == 0xc)
                {
                    display.ClearDisplay();
                }
                else
                {
                    // display on LCD
                    display.Write(bytes);
                }
            }
        }

        static void initialize_SerialPort()
        {
            // initialize the serial port for COM2 (using D2 & D3)
            serial = new SerialPort(SerialPorts.COM2, 9600, Parity.None, 8, StopBits.One);
            // open the serial-port, so we can send & receive data
            serial.Open();
            // add an event-handler for handling incoming data
            serial.DataReceived += new SerialDataReceivedEventHandler(serial_DataReceived);

        }

        ///
        /// Initialize the display shield
        ///
        static void initialize_LcdPanel()
        {
            // default width is 16 but controller still acts like 40 char buffer
            // setting the display width won't cause it to wrap at 16 characters
            display= new Hd44780Lcd(
                Data4: Pins.GPIO_PIN_D4,
                Data5: Pins.GPIO_PIN_D5,
                Data6: Pins.GPIO_PIN_D6,
                Data7: Pins.GPIO_PIN_D7,
                RegisterSelectPin: Pins.GPIO_PIN_D8,
                ClockEnablePin: Pins.GPIO_PIN_D9
            );
            display.ClearDisplay();
        }

        ///
        /// Dumb method that initializes the display in some "friendly way"
        ///
        static void tellUser_WeAreReady()
        {
            string greeting = "Type Here To See Text\n\r";
            byte[] greetingBytes = Encoding.UTF8.GetBytes(greeting);
            // Wait a little bet to let the bluetooth connection setup
            // -- ok this magic worked so I'm keeping it!
            Thread.Sleep(250);
            serial.Write(greetingBytes, 0, greetingBytes.Length);
            display.Write(greeting);
            display.ChangePosition(1, 0);

        }
    }
}
Thanks for reading...


The touch screen lcd monitors uses digital pins D4-D9 and can operate with 3.3V signals. The Netduino MF libraries support the on-board devices but not external chips or interfaces.
ReplyDelete