Posts

Showing posts from November, 2022

UiFlow Python turns an M5Stack into an Azure App Insights Dashboard

Image
I wanted to build an IoT dashboard that auto-populates from query Azure Application Insights and displays the query results. UIFlow, Circuit Python, and Micro Python all let you create low-code programs on IoT devices. I used M5Stack's UiFlow as a low-code Python generator.  The program runs an Azure query via REST API and displays the results on the built-in M5 Core display. The query can be manually triggered or run automatically on a timer without me writing any code. https://flow.m5stack.com/ This flow is available on This .m5f example on GitHub. Video Walkthrough Device Topology Our IoT device, the M5Stack Core 2, runs an API query against Application Insights.  The search results are returned as JSON.  The Device Display UiFlow lets us lay different fields and labels onto the LCD panel via drag and drop.  We can set the name of the component for later access. UiFlow/Python has pre-built blocks that let me

Raspberry Pi could not connect to Internet on FIOS but could reach all local nodes and DNS

Image
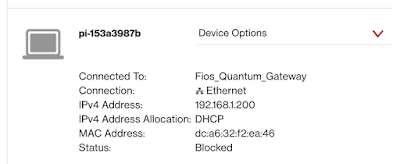
I have a Raspberry Pi network monitor that lost access to the Internet. DNS worked but everything else was blocked. Local network connectivity worked fine in both directions. It took me a couple of hours to identify the FIOS firewall issue. What Didn't Work Raspberry Pi could not curl or ping Internet services. Raspberry Pi could not get updates O/S re-installation What Worked Other machines on the local network could retrieve resources from the Internet via browser and command line. Other machines on the local network could ssh into the Raspberry Pi. Other machines on the local network could ping the Raspberry Pi. Raspberry Pi could ping the local machine. Raspberry Pi initiated DNS lookup worked Raspberry Pi traceroute to 8.8.8.8 or www.google.com would timeout Raspberry Pi /etc/dhcpcd.conf was unchanged. Raspberry Pi /etc/resolv.conf had the two needed rows in it Other Info This ran for two years without issue. Raspberry Pi IP issued via DHCP.  Other DHCP devices had no issues.

HTTP controlled LEDs and Relays with MicroPython and an ESP8266

Image
MicroPython makes it easy to create remote control or remote sensing devices.  We're going to expose two pins to web-based remote control with just a few lines of code. The code here is available on GitHub https://github.com/freemansoft/ESP8266-MicroPython Simple GUI Our GUI is a simple set of on/off buttons that toggle two pins.  The page shows the current state of the pins taking into account any pin inversion.  Click on image to enlarge My ESP8266 board has an LED on Pin 2 and a Relay on Pin 16. API is simple GET calls The device API is exposed as a set of simple GET calls.  You can see these in the URL bar when you click on any of the buttons. http :// 10.0.1.97 / ? dev1=on http :// 10.0.1.97 / ? dev1=off http :// 10.0.1.97 / ? dev2=on http :// 10.0.1.97 / ? dev2=off Yeah, these URLs are kind of funky.  The code is dumb so they need to match exactly.  The server ignores any parameters other than these.  The server may be susceptible to buffer overrun attacks.   Execution Flow T

Free up a lot of memory on the Raspberry Pi Zero by disabling the desktop

Image
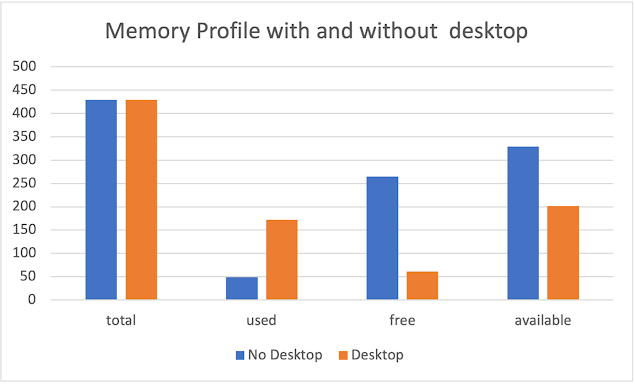
Did you install the full version of Raspian on your Raspberry Pi only to realize that you are going to run it as a headless appliance with no HDMI attached to it?  It turns out you can disable that desktop which will free up enough memory to leave almost 5x available to programs.    Disable the Desktop using raspi-config 1. Verify the free memory available after a restart with ` free -m` 2. Launch the shell-based configuration tool to disable  the desktop with ` sudo raspi-config` 3. Move through the screens shown below. 3. Reboot 4. Verify the free memory after a restart with ` free -m` Raspi-config Enabling and disabling the desktop involves changing the System Options We're going to change the boot/Auto Login  Select one of the console options.  You can always restore desktop access later by picking one of the Desktop  options The desktop should be disabled upon the end of the next restart. Before and After disabling the Desktop Disabling the deskto

MicroPython - Iterative development process with an ESP8266

Image
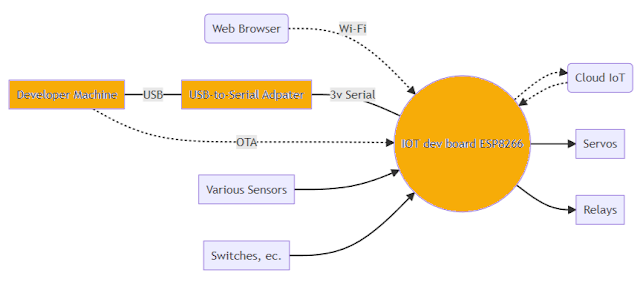
MicroPython lets you create Python-based modules that can be built on top of the frozen base Python image. You can upload python (py) files to the device's file system where they can be run separately and then called as part of the final product. Many teams can just use the existing Python capabilities and the bundled C modules without having to create c code of their own. There is a set of problems that are not real-time constrained and a class of  relatively inexpensive   IoT devices that are just spacious enough to support modular software and incremental updates.   Micropython makes it easy for the average developer to build modular software and incrementally develop and update components.    Developing software for IoT devices can be painful because there is no way to debug, step through or instrument code. The code runs from beginning to end.  It is debugged by looking at external symptoms or serial port output. Software is downloaded to the device as a monolithic unit becaus

Flashing MicroPython onto a generic ESP8266 IoT controller

Image
You can program the ESP8266 and ESP32 with a variety of tools and platforms including raw C, NodeMCU, Arduino IDE, LUA, and MicroPython. If you are here then you want to try MicroPython. Let's get MicroPython on our test board so that we start development. Test mule with an ESP8266EX with a 24Mhz crystal and relay Required Components ESP8266 compatible board or module A USB to 3.3V adapter and cable A PC with a USB port and Internet Access Installation and Verification Steps We're going to erase the program memory and then load MicroPython into the program memory just erased. Finally, we will test with a small bit of Python code. These are the steps I took to flash my ESP8266 board using my Windows 11 PC. Development Machine ESP8266 Target Device Comments Install Python3 Install esptool Python 3 tools are required to flash the ESP8266 over serial. Future updates can be OTA. python3 -m pip install esptool Unplug the board Set the jumper to program GPIO tied to ground