Posts

Showing posts from November, 2012

Adding cheap LCD display and bluetooth shields to a Netduino
Image
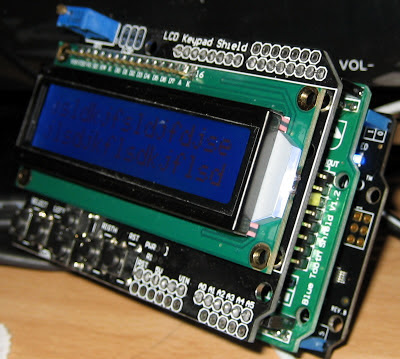
I purchased a cheap LCD keypad shield from DX  that makes it simple to add a 16x2 LCD display to an Arduino. The board also includes a set of buttons that are connected to a single analog pin through a resistor ladder network.  It's a pretty slick way of minimizing the pin count.  The board is designed for 5V.  The Netduino is a 3.3v system. The buttons resistor network is wired to the 5V supply so most of the buttons  analog values  are out of bounds for the 3.3V input.  Others have modified the board to use the 3.3v rail or dropped 5V to 3.3V through a resistor. I didn't do any of this because I don't need the buttons. The LCD uses digital pins D4-D9 and can operate with 3.3V signals.  The Netduino MF libraries support the on-board devices but not external chips or interfaces.  The LCD Controller is a standard HD44780 which is supported by nice netmftoolbox supplemental library. I downloaded the netmftoolbox library from codeplex and un...

Using a Cheap Bluetooth Shield on the Netduino

Image
I found this $19 Bluetooth Shield on DX.com from  Elec Freaks .  They claim it is Arduino compatible but the Wiki and spec sheet both say 3.3v only, in bold,  which means it doesn't work with a standard 5V Arduino.  Netduino  boards use Arduino shields and have 3.3V signal levels. The shield comes with an HC-05 Bluetooth module which can act as either master or slave. You can set the mode by sending it AT  style commands after configuring the two switches to set it to command mode.   It is a little simpler than the "you have x seconds from bootup to configure" that some other devices have. My board arrived in Slave Mode which works with a PC acting as Master. The module has an on-board voltage regulator and a set of daughter card connectors to add additional shields. They used offset top and bottom connectors rather than a single pass through so the card extends off one side.  I'd probably stack this board on top of any other s...

Installing Oracle Java and Tomcat on Ubuntu Server 12

Ubuntu Server comes with only a command line console so the usual GUI tools are unavailable.  You instead get to Java and Tomcat by hand. Oracle installations require the addition of another apt repository because they are license restricted from the Linux point of view. Install Java Enter the following commands into the VMWare visible console. Ubuntu server doesn't include add-apt-repository so first install that sudo apt-get install software-properties-common Enter "Y" if prompted. Add the repository that contains Oracle information sudo add-apt-repository ppa:webupd8team/java Press "Enter" to continue. Update the list of available packages sudo apt-get update Install Oracle 7 sudo apt-get install oracle-java7-installer Enter "Y" and click on "<OK>" to accept the license Verify Java is installed by running java -version You can set the JAVA_HOME for all processes by adding a adding a JAVA_HOME entry in /etc/environment. ...

Virtual Machine Networking: NAT or Bridged?

VMWare and other desktop or embedded hypervisors create virtual networks that the virtual machines connect to when running on the hosting software.  These virtual networks provide network connectivity from the guest machines through the host machine out to the general LAN/WAN.  There are two main modes. NAT:   The host puts the virtual machines on their own private network and acts as a network gateway for that virtual network.  Guest machines can communicate over the shared network and communicate to the WAN/Internet through the host machine.  Guest machines consume none of the physical network's address space because they are connected on the hosts "virtual network". Guest network interfaces can be configured using DHCP, provided by the host, or with fixed IP addresses to simulate a stable server environment.  Fixed IP addresses are handy when the virtual machines need to communicate with each other. VMWare typically uses the host network's VMnet8...

Setting the Size of the Terminal / Console Window in a Linux Server VM

We did a lot of Linux virtual machine installs when I worked with VMWare's SpringSource group. It let us run multi-node clusters off our MacBooks for customer demos.  We usually used desktop installes because they have you multi-terminal access to the machines.  I decided I wanted get some of my Linux/Java/OpenSource mojo back after 8 months on a Microsoft only project.  I downloaded Ubuntu 12.10 and installed server version so I could spin up more VMs on my Dell. The server install is thin and the Linux console defaults to 640x48 as displayed in the VMWare Player/Workstation.  It wasn't exactly obvious how to make that terminal window larger.  The desktop version of Ubuntu is sync'd with the VMWare window size through the VMWare tools.  That isn't true of the server version.  You have to do the following steps. These assume you have created and installed a new machine and are logged into the console window on the Virtual Machine. I did this with Ubu...