Cutting the TI Launchpad to Stuff it in a Smaller Case
I've been giving away TI Launchpad Blinken-Light projects to some of my software-only friends so they can have something new to play with. The projects are basically a TI-Launchpad, an RGB LED and a USB cable all mounted in some kind of case. I've burned the simple firmware available on GitHub so they can flash the LED over the serial port.
Gamestop a Nintendo DS gift card tin. The TI Launchpad mounts fine in the tin if you tern it sideways but you have to shorten the board if you want the USB connector to come out the back.
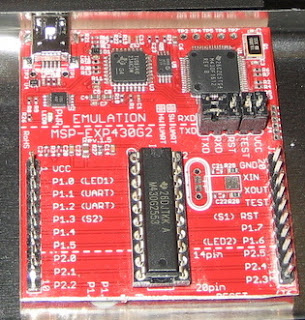
I used a Dremel cutting wheel to cut the board about one pin spacing below the last header pins. None of that circuitry is required to program or run the board. That cuts off the reset switch, the two LEDs and the extra Vcc and GND pins.

Here is the cutoff board mounted in a Gamestop DS Gift Card tin. I mounted the 10mm RGB LED to the case and drilled a hole in the top. The case is pretty thin so it is pretty easy to scratch the finish or dent metal in some hard to fix way.
Three small LEDs front mounted in the base would have been nicer. Another neat trick would be to mount one of the little LCD screens in the location where the Nintendo DS screen would normally go.
 I built most of my gift cases in the PS/2 gift card tin available from GameStop for $0.99 on closeout. It is big enough to hold the board without cutting where you can put the USB connector on the bottom tier under the overhang.
 I used the PS/2 case originall because it was cheap and because I was afraid of cutting the board. The PS/2 case is actually made up of three metal boxes. I had to cut through two of them to create enough room for the board. The metal work is a little sloppy but it's all hidden when the cover is put back on.
It is a lot less work to just cut the board and use a simpler case.
The Launchpad will also mount sideways in an Altoids tin. You can cut a hole in the back corner of the case for the USB connector if you wish to power or control it that way.
The Launchpad doesn't have any mounting holes. I normally just hot-glue the board to the case. The fit is tight enough that a blob of glue on each corner will hold it in place well enough for many cable insertions and removals.
You can create a single mounting hole by drilling through the TI Launchpad rocket logo between the two switches. You can see it in the center top of the board in this picture. Some folks also drill a hole where the TI logo used to be on version 1.4 and earlier boards. I haven't seen a PCB layout of the 1.5 boards. They changed the way RX/TX are connected to the jumbers on those and that space may no longer be available.

Gamestop a Nintendo DS gift card tin. The TI Launchpad mounts fine in the tin if you tern it sideways but you have to shorten the board if you want the USB connector to come out the back.
I used a Dremel cutting wheel to cut the board about one pin spacing below the last header pins. None of that circuitry is required to program or run the board. That cuts off the reset switch, the two LEDs and the extra Vcc and GND pins.

Here is the cutoff board mounted in a Gamestop DS Gift Card tin. I mounted the 10mm RGB LED to the case and drilled a hole in the top. The case is pretty thin so it is pretty easy to scratch the finish or dent metal in some hard to fix way.
Three small LEDs front mounted in the base would have been nicer. Another neat trick would be to mount one of the little LCD screens in the location where the Nintendo DS screen would normally go.
Other Cases
 I built most of my gift cases in the PS/2 gift card tin available from GameStop for $0.99 on closeout. It is big enough to hold the board without cutting where you can put the USB connector on the bottom tier under the overhang.
 I used the PS/2 case originall because it was cheap and because I was afraid of cutting the board. The PS/2 case is actually made up of three metal boxes. I had to cut through two of them to create enough room for the board. The metal work is a little sloppy but it's all hidden when the cover is put back on.
 It is a lot less work to just cut the board and use a simpler case.
The Launchpad will also mount sideways in an Altoids tin. You can cut a hole in the back corner of the case for the USB connector if you wish to power or control it that way.
Mounting to the Case
The Launchpad doesn't have any mounting holes. I normally just hot-glue the board to the case. The fit is tight enough that a blob of glue on each corner will hold it in place well enough for many cable insertions and removals.
You can create a single mounting hole by drilling through the TI Launchpad rocket logo between the two switches. You can see it in the center top of the board in this picture. Some folks also drill a hole where the TI logo used to be on version 1.4 and earlier boards. I haven't seen a PCB layout of the 1.5 boards. They changed the way RX/TX are connected to the jumbers on those and that space may no longer be available.


Comments
Post a Comment