Accessing the RabbitMQ Console in Cloud Foundry
Cloud Foundry - PaaS
Each Cloud Foundry instance is a self contained environment (cloud) that is generally intended to be use as a black box application container. It is implemented in a virtualized environment that hides the actual virtual/physical topology from the deployer. Service configuration, provisioning, log viewing and application deployment are done from outside the cloud through external tools. Cloud services may use any ports or other resources and use unique usernames and passwords for each instance. Applications rendezvous with services, at run time, via declared service names. Cloud services are not visible outside the container. All system monitoring must be done through log files, through code deployed in the application or through tooling provided by Cloud Foundry.
Service tunneling, where you can bind to the data port of a provisioned service, will be added to Cloud Foundry in a post 1.0 release. This blog article describes how it will work and how you can use it today.
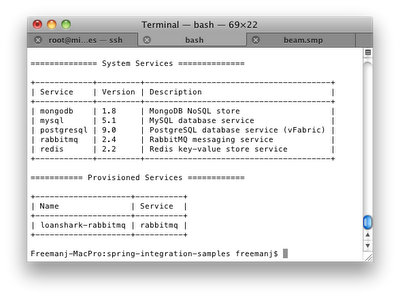 Cloud Foundry supports a broad set of services that can be discovered through the service catalog. Those services are provisioned, making them available to applications, via the vmc command line tool or through the STS Cloud Foundry plug-in . Multiple instances of any service may be provisioned in a single cloud/container. Service instances start as soon as they are provisioned. This screenshot shows the output of the vmc services command run against a (Micro) Cloud Foundry instance. There are 5 services types available for provisioning and one RabbitMQ instance started.
Applications can be made up of multiple custom code components each of which can be bound to some subset of the provisioned services. Individual application components can communicate with each other or share data through services that they share.
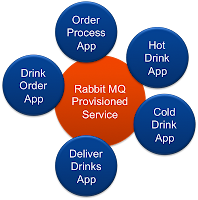 Example: A coffee shop workflow involving 5 people. One places the order, one takes the order, one person processes hot drinks, one cold drinks and one delivers the order. Those 5 components (people) might be implemented as separate processes that could be independently deployed. The 5 processes could communicate via a previously provisioned message broker that is service bound to each application.
Micro Cloud Foundry is a self contained, Virtual Machine (VM), version of Cloud Foundry running on a Linux Operating System (OS). It comes pre-loaded and configured to enable the various services without any installation hassle. Micro Cloud Foundry does not implement all of the isolation levels of the public cloud. We will use this feature to gain access to the RabbitMQ management console.
RabbitMQ in Cloud Foundry
Cloud Foundry supports several different services including RabbitMQ. You can see available services via the vmc services command line tool described above. A service like RabbitMQ can be provisioned (started) via vmc or SpringToolSuite (STS). That services is then bound a deployed application when the application is deployed and started. The application finds the service at run-time with a service name resolution process. Java/Spring users can see these as spring beans whose ids match the service name. The following screenshot shows a single RabbitMQ service instance that is called loanshark-rabbitmq. The instance is bound to the cafe-create-order-web application.
 Each entry in the "Services" tab represents a different service instance with its own name, resource pool, ports and user ids. The application in the "Applications" tab shows that "cafe-create-order-web" is selected. The information on the right is tied to that application. You can see that "loanshark-rabbitmq" is an application service for this application.
The RabbitMQ Management Console
RabbitMQ supports extension via plugins. The Management Console plug-in provides information and control functions for it's associated broker. Users can view queue depth, create exchanges and queues and set up security functions. Queued messages can be de-queued, viewed or deleted. This picture shows two queues each with 200 undelivered messages. Port 55672 is the standard admin port.
 The Management Console plugin is configured and enabled in Cloud Foundry but is not publicly available.
Cloud Foundry assigns random ports so to each RabbitMQ instance and
management server. This lets it support multiple brokers on a single
hosts and removes consumers assumptions about the environment.
The Management Console plugin is configured and enabled in Cloud Foundry but is not publicly available.
Cloud Foundry assigns random ports so to each RabbitMQ instance and
management server. This lets it support multiple brokers on a single
hosts and removes consumers assumptions about the environment.
Accessing the Management Console in Micro Cloud Foundry
Micro Cloud Foundry is designed to do local development and small deployments. It is not as "locked down" as the public or hosted Cloud Foundry environments letting us log in and access internal web services. RabbitMQ in the MCF runs with the management console enabled. The problem is finding the port number and username/password for running RabbitMQ instances.
This section assumes that you have a working Micro Cloud Foundry VM version 1.1. You should know the host name of that instance and the password you gave it at time of configuration. The host name will be something like <your cluster name>.cloudfoundry.me that is set by CloudFoundry.com when you got your token. You can see the host name in the VM console at the top of the screen.
Using Spring to Simplify Cloud Migration
The XML uses Spring Profiles to pick the correct bean definition at initialization time. The originating example runs as a java program in development and and in a Cloud Foundry environment for deployment testing. All Java code in Cloud Foundry is deployed in a container so we use a web application listener to do spring initialization in the cloud and a traditional Main() when running on a local machine. These two entry points provide a simple place to set the profile without having to create separate config files.
This code shows how the profile is used for the stand alone program:
This code shows how the profile is used in the web application listener:
Conclusion
Micro Cloud Foundry provides a simple way of deploying and testing applications along with their associated services without the headaches of manually installing all the components. It provides more open access than an external cloud making it possible to accesses tools and monitors that would not otherwise be available.
Each Cloud Foundry instance is a self contained environment (cloud) that is generally intended to be use as a black box application container. It is implemented in a virtualized environment that hides the actual virtual/physical topology from the deployer. Service configuration, provisioning, log viewing and application deployment are done from outside the cloud through external tools. Cloud services may use any ports or other resources and use unique usernames and passwords for each instance. Applications rendezvous with services, at run time, via declared service names. Cloud services are not visible outside the container. All system monitoring must be done through log files, through code deployed in the application or through tooling provided by Cloud Foundry.
Service tunneling, where you can bind to the data port of a provisioned service, will be added to Cloud Foundry in a post 1.0 release. This blog article describes how it will work and how you can use it today.
 Cloud Foundry supports a broad set of services that can be discovered through the service catalog. Those services are provisioned, making them available to applications, via the vmc command line tool or through the STS Cloud Foundry plug-in . Multiple instances of any service may be provisioned in a single cloud/container. Service instances start as soon as they are provisioned. This screenshot shows the output of the vmc services command run against a (Micro) Cloud Foundry instance. There are 5 services types available for provisioning and one RabbitMQ instance started.
Applications can be made up of multiple custom code components each of which can be bound to some subset of the provisioned services. Individual application components can communicate with each other or share data through services that they share.
 Example: A coffee shop workflow involving 5 people. One places the order, one takes the order, one person processes hot drinks, one cold drinks and one delivers the order. Those 5 components (people) might be implemented as separate processes that could be independently deployed. The 5 processes could communicate via a previously provisioned message broker that is service bound to each application.
Micro Cloud Foundry is a self contained, Virtual Machine (VM), version of Cloud Foundry running on a Linux Operating System (OS). It comes pre-loaded and configured to enable the various services without any installation hassle. Micro Cloud Foundry does not implement all of the isolation levels of the public cloud. We will use this feature to gain access to the RabbitMQ management console.
RabbitMQ in Cloud Foundry
Cloud Foundry supports several different services including RabbitMQ. You can see available services via the vmc services command line tool described above. A service like RabbitMQ can be provisioned (started) via vmc or SpringToolSuite (STS). That services is then bound a deployed application when the application is deployed and started. The application finds the service at run-time with a service name resolution process. Java/Spring users can see these as spring beans whose ids match the service name. The following screenshot shows a single RabbitMQ service instance that is called loanshark-rabbitmq. The instance is bound to the cafe-create-order-web application.

The RabbitMQ Management Console
RabbitMQ supports extension via plugins. The Management Console plug-in provides information and control functions for it's associated broker. Users can view queue depth, create exchanges and queues and set up security functions. Queued messages can be de-queued, viewed or deleted. This picture shows two queues each with 200 undelivered messages. Port 55672 is the standard admin port.

Accessing the Management Console in Micro Cloud Foundry
Micro Cloud Foundry is designed to do local development and small deployments. It is not as "locked down" as the public or hosted Cloud Foundry environments letting us log in and access internal web services. RabbitMQ in the MCF runs with the management console enabled. The problem is finding the port number and username/password for running RabbitMQ instances.
This section assumes that you have a working Micro Cloud Foundry VM version 1.1. You should know the host name of that instance and the password you gave it at time of configuration. The host name will be something like <your cluster name>.cloudfoundry.me that is set by CloudFoundry.com when you got your token. You can see the host name in the VM console at the top of the screen.
- Connect to the Micro Cloud Foundry instance with vmc. You may have run a set of commands to connect to the right cloud foundry instance, using vmc target, and register a user id with vmc register to create a useable user id.
- Verify that rabbitmq is an available service with vmc services .
- Provision a rabbitmq instance using either STS or vmc. The vmc command would be something like vmc create-service rabbitmq <instance name> where <instance name> is the name the running instance is registered under. STS users should use the server configuration screen that you get by double clicking on your cloud foundry server in the Servers tab.
- ssh into the MCF virtual machine as root ssh root@<your cluster name>.cloudfoundry.me using the vcap password you entered when you started up the MCF virtual machine.
- Find the running instance of Rabbit. All instances are located in /var/vcap/store/rabbitmq_srs/agent/instance/ There should be only one instance unless you provisioned rabbit more than once.
- Look in the rabbitmq.log file for the instance at /var/vcap/store/rabbitmq_srs/agent/instance/<rabbit_instance_id>/log/rabbitmq.log. Look for a line that gives the name and port. You'll need that to connect with browser.
- Look in the configuring_users log file to see what user id and password the cloud gave to your service instance. It should be a line that includes rabbitmqctl add_user. The full path to the file should be /var/vcap/store/rabbitmq_srs/agent/instance/<rabbit_instance_id>/log/configuring_users.log They will look similar to encrypted passwords.
- Connect to the management server with your web browser. Use the URL http://<cluster_name>.cloudfoundry.me Authenticate with the user name and password you got from the log file. You should now have full access to the management web interface. The user interface should initially show now exchanges or queues.
- Deploy an application bound to rabbit. You should see traffic in the management console you just connected to.
Using Spring to Simplify Cloud Migration
The opaque/proprietary nature of cloud deployments often means a developer has to code to the cloud. They end up with one version that uses the local deployment APIs and one that version that uses the Cloud APIs with the associated problems of determining which version to run at any given time. Spring's Dependency Injection (DI) architecture makes it easy for Java developers to flip between Non-Cloud and Cloud configurations by decoupling the module connection process. The following XML config shows how an AMQP connection bean could be configured Cloud Foundry and for a standard environment. The consuming code that is injected with or looks up this bean has no idea when version it is getting.
<!-- Obtain a connection to the RabbitMQ via cloudfoundry-runtime: -->
<beans profile="cloud">
<cloud:rabbit-connection-factory
id="rabbitConnectionFactory" />
</beans>
<!-- connect to the local broker using the default user name and password -->
<beans profile="dev">
<bean id="rabbitConnectionFactory"
class="org.springframework.amqp.rabbit.connection.CachingConnectionFactory">
<constructor-arg value="localhost" />
<property name="username" value="guest" />
<property name="password" value="guest" />
</bean>
</beans>
The XML uses Spring Profiles to pick the correct bean definition at initialization time. The originating example runs as a java program in development and and in a Cloud Foundry environment for deployment testing. All Java code in Cloud Foundry is deployed in a container so we use a web application listener to do spring initialization in the cloud and a traditional Main() when running on a local machine. These two entry points provide a simple place to set the profile without having to create separate config files.
This code shows how the profile is used for the stand alone program:
public static void main(String[] args) {
AbstractApplicationContext context =
CafeDemoAppUtilities.loadProfileContext(
"/META-INF/spring/integration/amqp/cafeDemo-amqp-xml.xml",
CafeDemoAppAmqp.class,"dev");
...
context.close();
}
AbstractApplicationContext context =
CafeDemoAppUtilities.loadProfileContext(
"/META-INF/spring/integration/amqp/cafeDemo-amqp-xml.xml",
CafeDemoAppAmqp.class,"dev");
...
context.close();
}
This code shows how the profile is used in the web application listener:
public void contextInitialized(ServletContextEvent arg0) {
AbstractApplicationContext context =
CafeDemoAppUtilities.loadProfileContext(
"/META-INF/spring/integration/amqp/cafeDemo-amqp-xml.xml",
CafeDemoAppAmqp.class,"cloud");
...
AbstractApplicationContext context =
CafeDemoAppUtilities.loadProfileContext(
"/META-INF/spring/integration/amqp/cafeDemo-amqp-xml.xml",
CafeDemoAppAmqp.class,"cloud");
...
}
Conclusion
Micro Cloud Foundry provides a simple way of deploying and testing applications along with their associated services without the headaches of manually installing all the components. It provides more open access than an external cloud making it possible to accesses tools and monitors that would not otherwise be available.


Incredible blog you got there buddy! I learned a lot in this blog and I hope that information can help me in the near future for me as a web developer. By the way haven't you heard that Web Services does amazing web services?
ReplyDeleteRamadan is our festival and you get wishes massages so you get Ramadan Mubarak 2016
ReplyDelete