Reclaiming disk space in your Windows Server Hyper-V virtual lab through deduplication
My 5 machine Windows Server 2012 virtual lab was using 91GB of space on my Macbook after installing the OS and infrastructure components into the host and guest machines. I was able to reduce the actual disk space used on my MacBook SSD by 50% through Windows Server deduplication and virtual disk shrink operations. That results in 47GB savings of physical disk space.
Disk Drive Layout
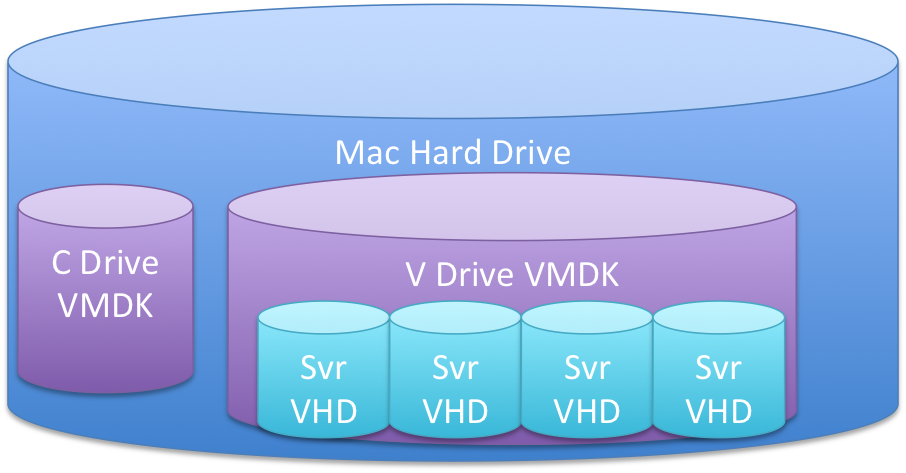
I have Windows Server Virtual Machine that runs Active Directory, DNS, Hyper-V and SQL Server Management Studio. It also hosts 4 other guest machines whose disk drives are over provisioned for the actual drive allocated. We can do this because none of the guest machines use all their disk space and because.
As an advanced topic, we can get additional savings with Disk Deduplication where windows can create only one copy of disk space that is identical across the guest VMs/VHDs located on the same server drive. The same operating system files exist across all VMs so we can get a 75% reduction in actual disk usage for all Windows O/S files.
Windows Server sees two hard drives c: 50GB and v: 60GB. Hyper-V manages 4 30GB expandable virtual drives inside the 60GB disk.
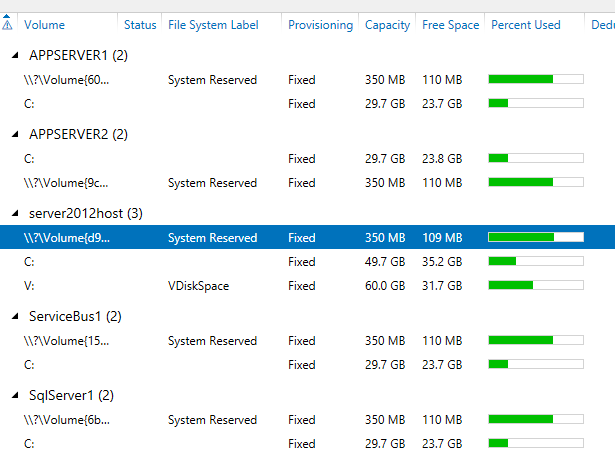
Disk usage after virtual machine creation and OS installation
Windows Server Disks after Active Directory and Hyper-V installation and after 4 Virtual machines crated with operating systems. The VMWare VMDKs are 42GB

Disk usage in the VHDs after OS installation
Disk usage after basic software installation in VMs
Windows Server Disks after Active Directory, Hyper-V and SQL Management Studio installation and after Virtual machines populated with SQL Server, Windows Message Bus and two App Servers. The VMWare VMDKs are 90gb

Disk usage in VHD after Application Role , SQL Server and Message Bus installed in Virtual machines.

Reclaiming Disk Space
- Defragment the drive holding the VHDs
- Repeat the following for each VHD
- Defragment the VHD using the windows defragmentation tool
- Compact the Dynamic VHD
- De-duplicate the drive holding the VHD
I used this blog article to aide in understanding the process.
Defragment a VHD
- Launch Disk Management
- Mount the VHD in Disk Management
- Use the Action-->Attach VHD
- Browse to the desired VHD
- Run the Disk Defragmenter and Optimize the hard drive.
- Unmount the VHDs in the Disk Management tool.
- Select a Disk in the Disk Management view
- Right Mouse and select Detach VHD.
Compact a VHD
- Use the Hyper-V Manager Action-->Edit Disk... feature. You can also use Edit Disk... in the Actions menu you see on the right hand side of Hyper-V Manager
- Follow the instructions in the Edit Virtual Hard Disk Wizard for a VHD.
- Browse to a vhd or vhdx.
- Select Compact as the action in the Choose Option panel.
Impact
This only gained 4GB back.

De-duplicate the drive holding the VHDs
The next step is to de-duplicate the drive holding the VHDs while they VMs are down. We know that a lot of the VHD contents are identical OS files and patches so we get huge savings. You don't want to run deduplication on running VMs so make sure they all down. I got some of the details from this blog.
Verify Data Duplication is installed. Install it using the Server Manager --> Manage --> Add Rolls and Features. Then look in Server Roles.

I'd recommend using the powershell de-dup commands and would consider not scheduling de-duplication jobs because you really only want to run this while the VHDs in the deduplicated volume are idle.
- Start Powershell
- Enable deduplication with Enable-dedupvolume <drive_letter>
- Set the deduplicaton configuration for the volume to 0 days instead of the default 5 if you wish to see results today Set-DedupVolume -Volume <drive_letter> -MinimumFileAgeDays 0
- Start the deduplication process Start-DedupJob -Volume <drive_letter> –Type Optimization
- Track the deduplication process Get-dedupjob and Get-dedupstatus
- You can see the amount saved with Get-dedupVolume or in the ServerManager --> File and Storage Services --> Volumes screen.
Deduplication reduced the space used by 85% going from 10GB to 52GB free.

We can see the guest VM disks, after starting the VMs. Their disk size hasn't change even though the V: drive that contains them has additional free space.

Compacting the Parent Drive when Nested
The above made space in my windows virtual machines. It didn't save me any physical disk space on my hard drive.
I'm running my windows -virtual lab inside VMWare Fusion on a Mac. That means my C: and V: drives on my Windows 2012 Server instance are really VMDK files on my Mac. All of the above work made additional space inside the VMDK but didn't save any actual disk space on my MacBook. VMware can help here if you have the vmware tools installed inside the Windows Server2012 VM. Run the following from inside the guest machine
c:\program files\vmware\vmware tools\vmwaretoolboxcmd.exe disk shrink V:\
c:\program files\vmware\vmware tools\vmwaretoolboxcmd.exe disk shrink C:\
It will run for a while preparing the shrink operation. You will then see a progress bar makes it look like the machine is shutting down that tells you it is shrinking the disk.

This saved me 47GB on my MacBook's physical hard drive taking me from 91GB to 44GB!
There is a Hyper-V equivalent of this if you are running your virtual lab inside of Hyper-V.


Comments
Post a Comment