Software Development in a Container - Coding by Copy - a Primer
Containers make it easy to set up a complex data scientist development environment. A developer can just spin up a Python, Jupyter Notebook, Spark, Hadoop, or another type of container on a local machine in minutes.
Containers can be confusing when you first work with them. Here we talk a little about how you can get code and data into your container environment and how you can get it back out.
I want to write code local to my laptop and run the code inside a fully configured Anaconda container. And, I'm lazy.
Two ways to get code onto a container for development
Containers are standalone mini machines with private disk space, CPU, networking and other services. They are not intended to retain state, something that we definitely want to do in a development environment. We need to get our code inside the container. We can do the same thing with data or we can have our code pull the data in at runtime.
We plan on doing all development on the container for this discussion.
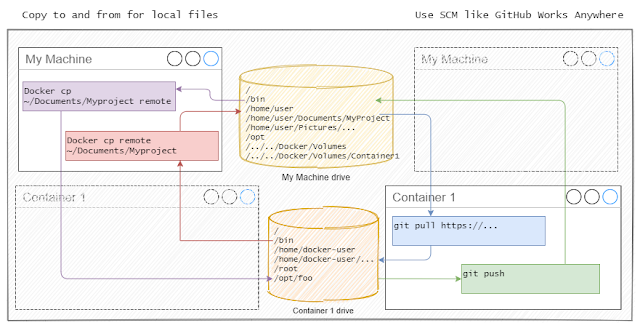
There are two primary ways of getting code onto a machine. We can push code into the container for development and execution and then pull it back out when done.
Alternatively, we can operate from inside the container. We can pull code from a remote repository, work on it and then push the code back to the repository.
Option 1: Copy Code to and from Container from outside
Starting work using code to the container
- Use "docker cp local remote" to copy from your host machine or your local developer machine to the docker container
Develop code
- Use container IDE or IDE on "My Machine" with remote server capability like Visual Studio Code
- Use "docker cp remote local" to copy from your docker container to your local / developer machine.
Option 2: Pull into and push out code from inside the container
Starting work pulling code to the container
- Log into the docker container with "docker exec -it ..."
- Run "git pull" to pull the code from the remote repository.
Develop code
- Use container IDE or IDE on "My Machine" with remote server capability like Visual Studio Code
- Run "git push" to push the code back to the repository
Video: This article
Related Content
- http://joe.blog.freemansoft.com/2020/01/edit-build-run-in-container-with-vs-code.html
- http://joe.blog.freemansoft.com/2021/02/software-development-in-container.html
- http://joe.blog.freemansoft.com/2021/02/software-development-in-container_9.html
Editing content using a host IDE with remote server
We want to edit, syntax check, debug, run the programs inside the container while using a familiar IDE. Some IDEs like Visual Studio Code can run in a split mode where the IDE runs on your local machine and a remote headless server copy runs inside the remote machine or container. Visual studio code can install its remote server component on any machine that you have SSH access and containers where it can remote exec.
Run The IDE your local machine. Open the remote access and edit and run the code that is actually on the remote container.
Visual Studio Code and other IDEs support git and other repository plugins on the remote server component. This means you can open a remote session on the container and then pull down and commit your code all via the local IDE and the remote server connection.
Editing content on the Container with container-based IDE
Some development environments like Jupyter Notebooks run as a web server. You can start the notebook server in the container on container startup. The IDE runs on the server so it can see files in that remote server's workspace.
Notebook servers tend to not have SCM integration. This means you may have to either remote shell into those machines to manipulate repositories or docker cp files into and out of the machine running the commands on your local machine.


Comments
Post a Comment