C# IOIO and I2C devices
The IOIO C# library on GitHub now has basic I2C support. Protocol support and resource management is lifted from the Java library. The upper API is message based rather than object based. TWI/I2C/SPI is managed via outbound messages. Data from I2C devices and message acknowledgements from the IOIO come back asynchronously via inbound Messages.
 The Expander Plug is based on the MicroChip MCP23008 port expander. Programming examples are available on the Jee Labs web site. The Microchip web site has the chip programming guide.
The LED assembly already had a current limiting resistor. I just plugged it in across the "+" pin on the expansion port and the port pin next to the power pin.
The port expander default address is 0x20. It has 10 registers that control behavior and transfer data.
JeeLabs makes a bunch of 3.3v I2C devices that are easy to use.
This code posts the TWI configuration message. This code:
logging truncated to improve readability.
This code:
logging truncated to improve readability.
logging truncated to improve readability.
logging truncated to improve readability.
logging truncated to improve readability.
Hardware
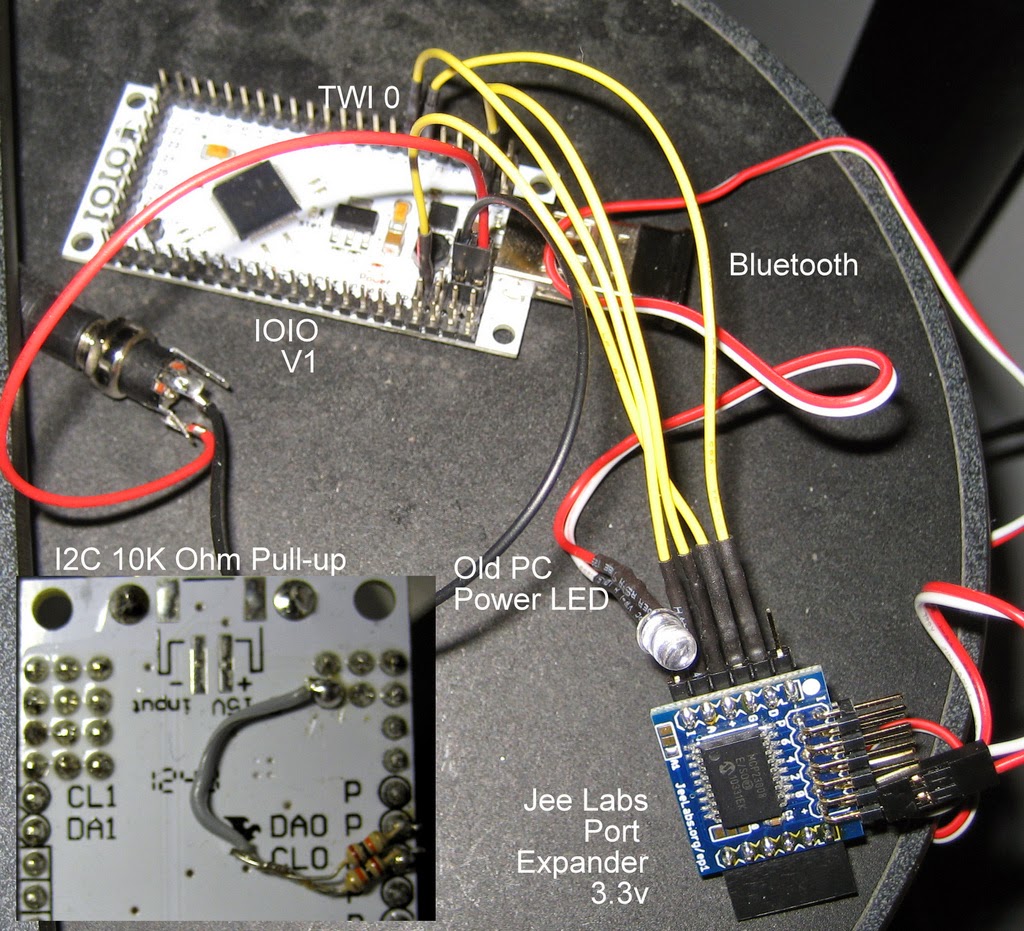
This was tested with an IOIO V1, Bluetooth module, a JeeLabs Expander Plug and an old Computer power LED.
I2C device
The Expander Plug is based on the MicroChip MCP23008 port expander. Programming examples are available on the Jee Labs web site. The Microchip web site has the chip programming guide.The LED assembly already had a current limiting resistor. I just plugged it in across the "+" pin on the expansion port and the port pin next to the power pin.
The port expander default address is 0x20. It has 10 registers that control behavior and transfer data.
JeeLabs makes a bunch of 3.3v I2C devices that are easy to use.
IOIO Hardware
You must have pull up resistors on DA and CL. I wasted 3 hours convinced that I didn't really need the resistors. You can see my 10K Ohm pull resistors tied to the back side of a 3.3v power pin. Each resistor is tied to its pin and the 3.3v power pin. It is not a parallel resistor even if it looks like that in the picture.
JeeLabs has their own pin naming convention. AIO corresponds to IOIO I2C CLK pin. DIO corresponds to IOIO I2C pin Data
Connect up 4 wires on the device
- Expander DIO -> IOIO I2C Data
- Expander AIO -> IOIO I2C Clock
- Expander + -> IOIO +3V
- Expander GND -> IOIO GND
- Expander INT -> N/C
- Expander Pwr -> N/C
For TWI 0
- Expander DIO -> IOIO Pin 4 (DA0)
- Expander AIO -> IOIO Pin 5 (CL0)
- Expander + -> IOIO +3V
- Expander GND -> IOIO GND
- Expander INT -> N/C
- Expander Pwr -> N/C
Talking with the Port Expander
The TwiI2CTest.cs in the GitHub project shows more details as to how this is set up. The test logs messages from the IOIO. It does not show how to pick up the return messages using notifications.
Open and Configure TWI
We get two responses back when we configure one of the Twi pin sets. I don't yet understand why the TXStatus report says 256 bytes remaining when it is actually 0.
int TwiVirtualDevice = 0;
 LOG.Debug("Configuring TWI");
IOIOMessageCommandFactory factory = new IOIOMessageCommandFactory();
ITwiMasterConfigureCommand startCommand = factory.CreateTwiConfigure(TwiVirtualDevice, TwiMasterRate.RATE_400KHz, false);
ourImpl.PostMessage(startCommand);
System.Threading.Thread.Sleep(50);
TwiSpec twiDef = startCommand.TwiDef;
results in this outputTwiI2CTest - Configuring TWI IOIOImpl - Post: IOIOLib.MessageTo.Impl.TwiMasterConfigureCommand IOIOHandlerCaptureLog - HandleI2cOpen i2cNum:0 IOIOHandlerCaptureLog - HandleI2cReportTxStatus i2cNum:0 bytesRemaining:256
logging truncated to improve readability.
Configure port expander I/O pins as outputs
Set a value in the registers to configure the pins as outputs. We get a confirmation messageThis code:
int JeeExpanderAddress = 0x20;
byte RegisterIoDir = 0x00;
byte[] ConfigureAllOutput = new Byte[] { RegisterIoDir, 0x00 };
LOG.Debug("Configuring port direction as all output ");
ITwiMasterSendDataCommand configureDirectionCommand = factory.CreateTwiSendData(twiDef, JeeExpanderAddress, false, ConfigureAllOutput, 0);
ourImpl.PostMessage(configureDirectionCommand);
System.Threading.Thread.Sleep(50);
results in this output:TwiI2CTest - Configuring port direction as all output IOIOImpl - Post: IOIOLib.MessageTo.Impl.TwiMasterSendDataCommandTwi:0 ExpectBack:0 SendingBytes:00 00 IOIOHandlerCaptureLog - HandleI2cResult i2cNum:0 NumBytes:0 ReceivedBytes:
logging truncated to improve readability.
Set the port expander output pins to"low" values
Note: The LED lights up when the pins sink current. This means the LED lights up when the pins are low.
This code writes to a control register and then queries the output latches for state.
This code writes to a control register and then queries the output latches for state.
LOG.Debug("Post Low");
ourImpl.PostMessage(commandLow);
System.Threading.Thread.Sleep(150);
LOG.Debug("Check Are Latches Low");
ourImpl.PostMessage(queryOLat);
System.Threading.Thread.Sleep(50);
results in this output
TwiI2CTest             - Post Low
IOIOImpl               - Post: IOIOLib.MessageTo.Impl.TwiMasterSendDataCommandTwi:0 ExpectBack:0 SendingBytes:09 00
IOIOHandlerCaptureLog  - HandleI2cResult i2cNum:0 NumBytes:0 ReceivedBytes:
TwiI2CTest             - Check Are Latches Low
IOIOImpl               - Post: IOIOLib.MessageTo.Impl.TwiMasterSendDataCommandTwi:0 ExpectBack:1 SendingBytes:0A
IOIOHandlerCaptureLog  - HandleI2cResult i2cNum:0 NumBytes:1 ReceivedBytes:00
logging truncated to improve readability.
Set the output pins to"high" values
Write the pin output control registered. Write bits to the register whose values represent pin state
LOG.Debug("Post High");
ourImpl.PostMessage(commandHigh);
System.Threading.Thread.Sleep(150);
LOG.Debug("Check Are Latches High");
ourImpl.PostMessage(queryOLat);
System.Threading.Thread.Sleep(50);
results in this ouiput
TwiI2CTest             - Post High
IOIOImpl               - Post: IOIOLib.MessageTo.Impl.TwiMasterSendDataCommandTwi:0 ExpectBack:0 SendingBytes:09 FF
IOIOHandlerCaptureLog  - HandleI2cResult i2cNum:0 NumBytes:0 ReceivedBytes:
TwiI2CTest             - Check Are Latches High
IOIOImpl               - Post: IOIOLib.MessageTo.Impl.TwiMasterSendDataCommandTwi:0 ExpectBack:1 SendingBytes:0A
IOIOHandlerCaptureLog  - HandleI2cResult i2cNum:0 NumBytes:1 ReceivedBytes:FF
logging truncated to improve readability.
Close the TWI interface
Remeber to clean up after yourself. This releases Twi pool
ITwiMasterCloseCommand closeCommand = factory.CreateTwiClose(twiDef);
ourImpl.PostMessage(closeCommand);
results in
IOIOImpl               - Post: IOIOLib.MessageTo.Impl.TwiMasterCloseCommand
IOIOHandlerCaptureLog  - HandleI2cClose i2cNum:0
logging truncated to improve readability.


Comments
Post a Comment