Edit-Build-Run in a Container with VS Code
Do you want to try out new technologies without installing a bunch of software inside your local machine? Do you wish to edit, build and debug code on commonly available Docker containers without having to build custom development containers? Visual Studio Code with remote extensions let you do just that.
I wanted to play with Machine Learning, Jupyter Notebooks, and TensorFlow without mucking up my local machine. ML tooling is large and complicated to install. The easiest way to do this is to run Anaconda/Jupyter/tensor-flow in containers derived from unadulterated publicly available Docker images.
Jupyter notebooks are great but sometimes I want an IDE. VS Code Remote lets me use a standard IDE while developing in a remote sandbox. It provides command line access without forcing me to command line-based tooling.
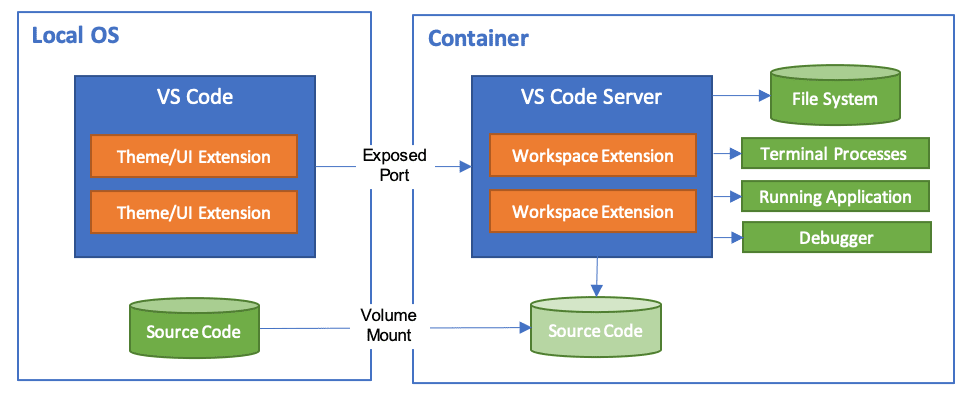
Visual Studio Code can build, run and debug on a remote machine via its various remote extensions. Remote Extension for Docker lets you edit/compile/debug code sitting in Docker containers from your main laptop experience. Visual Studio Code essentially runs headless inside the Docker container with the local Visual Studio acting as a viewport into the remote VS Code server. Many of the standard VS Code extensions can be installed in the remote/container VS Code so that they run inside the remote Docker container.
Microsoft has a lot of documentation that describes how to use their Docker Images for various development platforms. I wanted to use VS Code with non-Microsoft-derived images. I couldn't find anything that told me how to use VSCode with already deployed containers.


I wanted to play with Machine Learning, Jupyter Notebooks, and TensorFlow without mucking up my local machine. ML tooling is large and complicated to install. The easiest way to do this is to run Anaconda/Jupyter/tensor-flow in containers derived from unadulterated publicly available Docker images.
Jupyter notebooks are great but sometimes I want an IDE. VS Code Remote lets me use a standard IDE while developing in a remote sandbox. It provides command line access without forcing me to command line-based tooling.
Visual Studio Code can build, run and debug on a remote machine via its various remote extensions. Remote Extension for Docker lets you edit/compile/debug code sitting in Docker containers from your main laptop experience. Visual Studio Code essentially runs headless inside the Docker container with the local Visual Studio acting as a viewport into the remote VS Code server. Many of the standard VS Code extensions can be installed in the remote/container VS Code so that they run inside the remote Docker container.
VS Code and Docker components and connectivity
The mount point is not required.
Microsoft has a lot of documentation that describes how to use their Docker Images for various development platforms. I wanted to use VS Code with non-Microsoft-derived images. I couldn't find anything that told me how to use VSCode with already deployed containers.
- https://code.visualstudio.com/docs/remote/containers
- https://code.visualstudio.com/docs/remote/containers-advanced#_developing-inside-a-container-on-a-remote-docker-host
This walk-through demonstrates remotely connecting to a publicly sourced container that was created without VS code in mind. Our pattern lets us develop images originating from anywhere we allow.
Using VS Code with source on a Docker container
This approach opens two VS Code windows, the original launch window and a window for the remote session on the Docker container. All the development happens in the 2nd window, the one connected to the Docker container. I'm sure there are other ways to do this.
Assumptions
- VS Code is installed locally.
- VS Code Docker extension is installed.
- VS Code Remote - Development extension pack is installed.
- Docker is installed and running locally
- Our target container is running in it.
- Source code is available inside the Docker container either via a volume mount or some other method like local version control. The VS Code Remote extension can clone code from version control into named volumes to simplify this.
Connect to a remote container
- Run your Docker container.
- Run Visual Studio Code
- Select the Docker Plugin
- Right mouse on the container you wish to edit / build / run on
- Select Attach Visual Studio Code from the drop down
- New window will open with a purple bar on the bottom.
- VSCode attempts to install the server.
- You will see Opening Remote... Installing Dev Components...
- The remote green box in the lower corner will have your container name.
- A container name string , [Container xxxx/yyy] , will appear in the title bar
- A new shell prompt will open on that container
Install Remote components
You have to install the Visual Studio remote components one time per target Docker container
- Click on the Extensions button on the left side.
- Find the plugins required for remote debugging.
- Select Install in Container xxxx for your desired plugin
- In my case I installed the Python extension.
- Click on Reload Required if the plugin asks for it. The workspace will refresh as the remote side restarts

Remote extension installed
Open a folder on the remote side.
- Select the Explorer button on the left
- You should see No Folder Opened
- Click on Open Folder button
- Select the folder on the Docker container that contains the code to develop
- The bar at the bottom will change from purple to blue

Opening a remote folder

Remote folder opened
Build and run program on container
There are 3 ways to do this for a python program. Other languages probably have at least two of these approaches.Using the Debug menu
- Select the file to run
- Menu Debug --> Run without debugging
From the context menu, in a terminal
- Right mouse on a python file
- Select Run Python file in terminal
- It should open a terminal window and run the program
From the context menu, in a python interactive (Jupyter style) interface
- Right mouse on a python file
- Select Run current file in python interactive window
- Interactive panel will come up and run

Remote session connected to a stock Tensorflow/Tensorflow:latest container
Python notes
People using Python can select the version of Python by clicking on the version string on the bottom. If you can't the version at the bottom that then you have to select the version of python in the toaster panel the first time you run a program.
Function Availability
| Utility | Connection Type |
VS Code Extensions |
Files via | |||
|---|---|---|---|---|---|---|
| Utility | VS Code Remote |
Remote Shell |
Installed |
Not Installed | Volume mount |
GIT |
| Best | X | [2][4] | [5][7][9] | |||
| Best | X | [2][4] | [6][8][10] | |||
| Good | X | [3][4] | [5][7][9] | |||
| Good | X | [3][4] | [6][8][10] | |||
| OK | X | [3] | [5][7][9] | |||
| OK | X | [3] | [6][8][10] | |||
- n/a
- Remote execution via IDE with debug
- Remote execution via remote shell without IDE integration
- Can edit in remote file system via VS Code
- Can edit files on development machine. Changes on host appear in container.
- Cannot edit files development machine.
- Must enable volume sharing.
- Requires Git installation in container
- Does not work with remote cloud containers
- Works with remote containers where sharing isn't possible


Comments
Post a Comment