Commercial Chef CCD100W6 Dehydrator plus Rubbermaid Commercial 6-Quart Storage container for 3D filament drying
This is yet another example of how you can convert a home food dehydrator into a filament dryer.
CCDW100W6 + Rubbermaid Commercial Storage Container

I picked this lid because it should be relatively heat resistant having been created for food items including hot liquids.
Two Inland 1Kg spools fit in the dehydrator with this tub as a lid. I only dry one at a time. The hot air actually blows up through the centers of the spools.
I'd recommend using at least one or two of the dehydrator trays. You want to make sure you have a passthrough to get enough flow to get the air back into the heater at the base. You don't want to overheat the base.
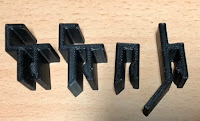 This went threw a few iterations. From left to right
The clips snap into the tub lip probably in the same way the rubbermade lids would. They do not snap to the dehydrator tray. Instead, the 4 clips provide a friction fit.
Dehydrator Components
Commercial Chef Food Dehydrator, Dehydrator for Food and Jerky, CCD100W6, 280 Watts, White 240cm diameter. This is smaller than some of the others.
Rubbermaid Commercial Products Round Storage Containers, 6-Quart/.25-Gallon, Clear, High-Temperature Range Food Organization for Wet/Dry Food in Kitchen/Restaurants/Cafeteria 240cm diameter to the middle of the lip. The product dimensions are listed as 10"L x 10"W x 7.63"H but I think that is to the outside edge. Rubbermaid Storage Container is sized to sit directly on top of the dehydrator trays or the dehydrator base.
Clip models on Thingiverse Print 4 of them.
YouTube Video
Fastener Iterations

- The first iteration worked but it was too easy to bump the top. The little bump latches into the container lip. The outside arm needed to be longer to reach far enough down the side of the plastic tray or base.
- The second iteration somewhat fixed the problem enough.
- I thought iteration 2 was correct so I did a low-plastic version. It turns out that was hard to manipulate to pry the clip back enough to insert the lid onto the tray.
- This is the iteration that I'm actually using and that is shown in the pictures. The outside leg was still too short to be easily used and I needed a way to push on the clip to cause it to open a little to fit over the tray.
 Final Fastener Design
The clips snap into the tub lip probably in the same way the rubbermade lids would. They do not snap to the dehydrator tray. Instead, the 4 clips provide a friction fit.
 Vent Holes

This is less airflow than the original top. This worked fine for my 60 min test. More holes may be needed
Revision History
Created 2023 05


Comments
Post a Comment