Posts

Showing posts with the label 3d Printing

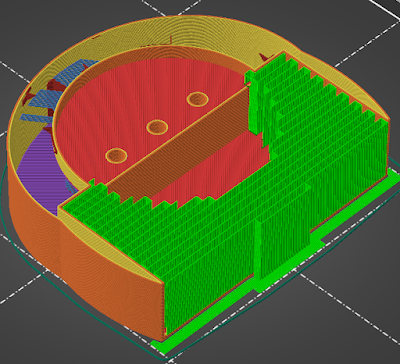
Take bed motion into account when printing narrow parts

Image
This is a bit embarrassing but I printed a chainsaw cosplay blade the other day and it went great.   Then I re-sliced and reprinted.  The 2nd print set failed when one of the pieces lost adhesion. It fell over .  Part of the reason that happened is because I laid out the pieces aligned such that the narrow axis of the part was in the same direction as the bed movement.   I then re-sliced oriented so that the parts lined up in the direction of motion and it printed without problems. Rafts and supports are great but sometimes you can help yourself by picking the right part/axis alignment. Video Short Revision History Created 2024/10

Cut a model with Prusa Slicer and put it back together with dovetail joints

Image
The Prusa Slicer supports a couple different patterns for cutting a model into pieces and then joining it back together after the print. I wanted to print a sword that was too large for my printer.  It needed to be in 4 pieces.  The Prusa Slicer supports cutting a model using an infinite plane and joining those back together after the print with plugs, snaps, dowels, or dovetail joints.   The dovetails work great but need different reinforcement and printing settings than the plugs or snaps. The standard planar cut The standard cut is "planar" or a flat cut across the piece.  This is a pretty common way of cutting a figure to split printing or for some other need. The slicer "Add Connectors" button brings you to another screen that lets you size the connectors that will join the two pieces. You can place a connector anywhere on the cut line by clicking on it.  The geometry of the connector is specified in the panel. Dovetail Cut You can instead try a doveta...

Prusa 2.6 3D Slicer demonstrates the power of open source contributions - tree supports

Image
Prusa Slicer is another fantastic example of the strength of open-source software .  The Prusa Slicer 2.6 release showed out-of-the-box thinking that can significantly impact 3D print times and simplify trimming and post-processing. My favorite new feature is tree supports  where the program takes an intelligent approach to building supports for overhangs and spans that are too big to be printed over nothing but air . Video https://youtu.be/2JBIeFagYnQ 3D Model Used Mason Jar lamp on Thingiverse Supports Prusa Slicer 2.5 supported the printing of removable supports when rendering longer spans over open spaces.  The molten filament will droop as it crosses from one support to another. The best practice guidance is to use supports  for any angle over 45 degrees. The green zig-zag is the removable support material. They are dense and can be difficult to remove. The end result is that the final print can have a lot of places that may need minor touchups. The zig-zag ends...

Commercial Chef CCD100W6 Dehydrator plus Rubbermaid Commercial 6-Quart Storage container for 3D filament drying

Image
This is yet another example of how you can convert a home food dehydrator into a filament dryer.  CCDW100W6 + Rubbermaid Commercial Storage Container This storage bucket fits right on top of the lip of the trays or the base.  It does not fit over, outside, or inside the lip. I like this bucket because it makes for zero air gap and because it was a lot simpler than printing a bunch of extension pieces. The bucket does get narrower at the bottom so you can't stack spools all the way to the top I picked this lid because it should be relatively heat resistant having been created for food items including hot liquids. Two Inland 1Kg spools fit in the dehydrator with this tub as a lid. I only dry one at a time. The hot air actually blows up through the centers of the spools.   I'd recommend using at least one or two of the dehydrator trays. You want to make sure you have a passthrough to get enough flow to get the air back into the heater at the base. You don't want to over...

3D printing a geodesic dome base for a mason jar style firefly light

Image
We are still iterating on Mason jar firefly lights.  We wanted more light and the most obvious way to do that is to invert the jar so that light shines through the base of the jar.   I have zero CAD skills and only basic tools like Microsoft 3D Builder. This means I need to mix in publicly available components for any complicated shapes or surfaces. I resized the same dome and thinned it out by creating a sphere slightly smaller than the dome and then subtracting that from the dome. I then took a threaded model and inserted it through the top of the dome.  and extruded a hollow box into the back of the unit for the battery box.  The item at the right is the result.    Previously seen in Joe's modeling app A previous article https://joe.blog.freemansoft.com/2023/03/3d-printing-battery-box-holder-for.html was about printing a battery box that fits inside the mason jar.  It was simple but wasted much of the light that went through the bottom gla...

3D Printing a battery box holder for a mason jar style firefly light

Image
We put together some firefly light jars for some accent lighting.  The light is an LED string dropped into a jar powered by an AA battery pack.  We originally just dropped the whole package into the mason jar. Using them without a cover was kind of cumbersome because you had to reach your hand into the jar every time you wanted to turn them off.   I found a plan on Thingverse and adapted it to better fit our needs and battery pack.  The design attached the jar like any of the two-part lids.  We just drop the lid part and retain the threaded attachments. The Plans - The Video and All That This article as a YouTube video  STL files can be found at https://www.thingiverse.com/thing:5928345 It looks like the Ikea lights we used are the  Ledfyr Standard Mason Jar In Use - On the Jar Drop the string of lights into the jar.  Slide the battery pack into the slot at the top. Push the wire into the slot on the side of the lid.  Insert the mount wi...