Install a Microsoft Virtual Lab on a Mac with Fusion and Hyper-V
Modified 2013/02/09 to add remote management enablement
We're going create a Hyper-V Microsoft virtual lab environment on a Mac with the following configuration as discussed in this previous blog article http://joe.blog.freemansoft.com/2013/01/run-microsoft-virtual-lab-on-mac-with.html. We can use the same approach on Linux machine using VMWare workstation / player.
Our mini-data center consists of 5 machines.
- A Windows 2012 Server hosting Active Directory and DNS. The machine also holds/manages the hyper-v environment used to run the rest of the machines
- Two Windows 2012 servers to be used as application machines
- One Windows 2012 server used to run SQLServer 2012
- One Windows 2012 server used to run the on-prem version of windows service bus
We're not actually going to install any application software in this article..

- Install Windows Server 2012 that will be our AD/DNS/Hyper-V host
- Hack the VMWare/Fusion/Workstation dhcp.conf file to give this windows server a fixed address.
- Install and configure Active Directory / DNS and Hyper-V
- Install multiple guest machines
- Install a guest machine in Hyper-V
- Give the machine a sensible host name
- Hack the VMWare/Fusion/Workstation dhcp.conf file to give this Hyper-V guest a fixed IP address and to point it at the server first created that has DNS.
- Add the machine to Active Directory
- Add the machine to the pool of managed servers on the base machine's Server Manager console
- (Optional) Activate all the machines.
- (Optional) Enable remote Computer Management on the virtual machines
Sizing Our Virtual Lab
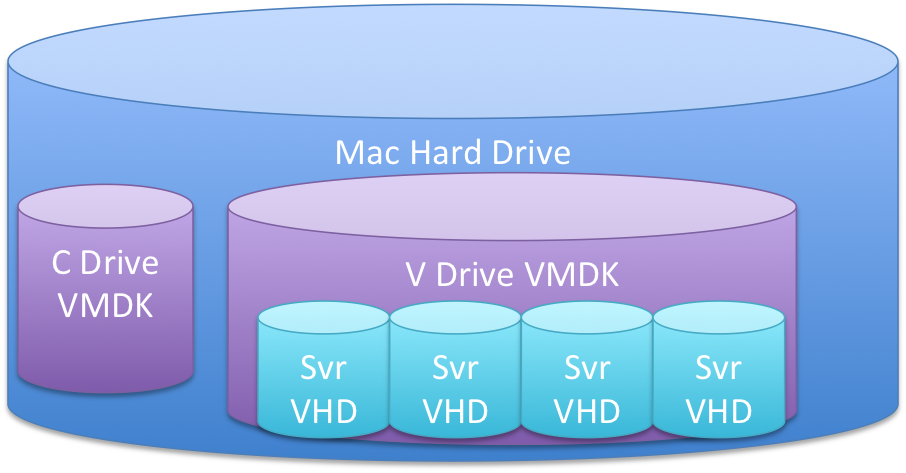
We're going to create a VMWare virtual disk (vmdk) to hold our primary, Hyper-V/AD/DNS, machine. That VMDK will be fully allocated to the server. That windows server hosts Hyper-V and will allocate pieces of the at VMDK for each of the VHD used by the individual Hyper-V virtual machines.

The default minimum size for a windows virtual machine is 30GB. In our case we have essentially 5 virtual machines including the AD machine for a total of 150GB of disk space as allocated by VMWare Fusion to its VMDK. You can actually allocate less disk space when not using pre-allocated disks because the hypervisors will only grow the virtual disks to the size actually used. I've allocated 110GB and could easily have gotten away with less. The following picture shows how much disk space is actually used before any software is installed on each machine.
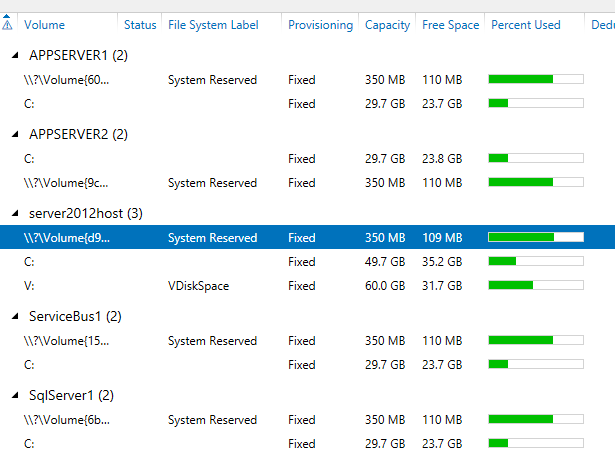
I actually ended up allocating two drives. One for the Hyper-V/AD/DNS machine and one that is used as disk space for all of the virtual machines hosted in Hyper-V. I did this because I didn't initially think through how much space I needed for all of the virtual machines. Note that I only allocated 60GB for the Hyper-V machines even though I had 4 30GB machines running on that. I've over-allocated the disk space knowing that most of the machines will never reach anywhere near 30GB of disk usage. The hyper-v VHDs can not all expand to their maximum sizes because they are sitting on a VMDK smaller than that amount.
 Disk space usage after main Windows Server 2012 (AD/Hyper-V) and 4 bare Windows Server 2012 core installations
 Disk space usage after loading SQL Server, SQL Studio, Windows Message Bus and Application Server features into the VMs.
I'm not recommending it but one advantage of a two drive setup is that the primary drive won't run out of disk space even if the hyper-v virtual disks grow beyond the 60GB allocated to them.
Windows Server with Multiple Drives when Hosted
Windows Server 2012 treats non-primary virtual disks as SAN drives. So in this case, I allocated two VMWare VMDK drives to VMWare Fusion. Fusion then made one of those the primary for our main Windows Server 2012 instance and the other a supplemental drive V in the picture. That Windows Server 2012 instance sees the second drive as a SAN. You have to enable the SAN drive before you are able to use the Windows Server 2012 disk manager to partition, format and mount the drive as a drive letter.
Installing Microsoft Server 2012 in VMWare Fusion
- Create a new virtual machine with the appropriate configuration.
- The quad core MacBooks appear as 8 core machines due to hyperthreading. I allocated 4 cores to the Microsoft Server 2012 virtual machine because it will need to then divy those cores out to it's Hyper-V managed virtual machines. Use NAT networking and allocate enough memory. I allocated the Fusion 4 maximum 8GB of memory because Hyper-V will also divy that up among the virtual machines it is managing
- 4 cores
- NAT Networking
- 8GB memory
- Enough disk space for all the virtual machines needs. We discussed non-preallocated 150GB above. I allocated 110GB across two drives. You can use one drive and size appropriately based on your needs.
- Boot the virtual machine and install Microsoft Server 2012 in VMWare Fusion
You should have a running standalone Windows Server 2012 VM running in Fusion after the installation. It will not have AD , DNS or Hyper-V enabled. - You will be asked to pick an administrator password. I re-use this password here for all the VMs I created later to simplify managing this cluster.
- Capture the network device MAC address Fusion gave your new server. You will need it later. Virtual Machine --> Network Adapter --> Network Adapter Settings We will use this to reconfigure the VMWare Fusion DHCP server later.
- Note I found that the MAC address on this adapter wasn't as useful as I thought.
- Capture the network device MAC address for the Virtual switch in the Microsoft Server 2012 instance. We will use this to configure the VMWare Fusion DHCP server later.
- Type ipconfig in a powershell window and look at the line labeled Physical Address
- or
- Server Manager --> Local Servers --> click on vEthernet
- You should see the Server 2012 Network Connects.
- Double click on the vEthernet (Intel(R) PRO 1000 MT) Network Connection - Virtual Switch
- Double click on Details
- Record the MAC address under Physical Address
- We would use 00-50-56-21-B8-6A in the screen shot below.


Configure Fusion VMX to fool Windows Server for Hyper-V
You can find more info on this in other blog postings http://www.vdicloud.nl/2012/03/05/vmware-fusion-and-windows-server-8-beta-with-hyper-v-3-0/
- Shutdown Windows Server 2012
- Terminate Fusion
- Edit the VMX file and add the following settings at the bottom of the file.
- hypervisor.cpuid.v0 = FALSE
- vhv.enable = TRUE
- mce.enable = TRUE
- Start Fusion and edit the VM settings.
- Change the preferred virtualization engine to Intel VT-X with EPT in the drop list
- Enable 3D graphics if you intent to install VMWare Tools in this VM
Configure For Fixed IP Even Though Running DHCP
Fusion must be restarted for any dhcpd.conf changes to take affect.
We want all of our machines to used fixed IP addresses and are going to use the dhcpd.conf file to make this happen. I used this tutorial as a reference http://nileshk.com/2009/06/24/vmware-fusion-nat-dhcp-and-port-forwarding.html We don't know all the MAC addresses for all of the servers so we're going to have to do this in phases.
The Windows server hosting Hyper-V will end up with two IP addresses, one for the ethernet adapter created by Fusion and one for the Virtual Switch created inside Microsoft Windows. We recorded those above when we installed the server.
- Edit the VMWare vmnet8 dhcpd.conf file with an elevated privilege account.
- MAC: This is located in /Library/Preferences/VMWare Fusion/vmnet8/dhcpd.conf
- PC: [notes to be added later]
- Linux: [notes to be added later]
- Add sections at the bottom for both the MAC assigned by Fusion and the VNET adapter assigned by windows.
- Choose addresses outside of the range shown in the subnet range attribute. That range is the list of addresses the VMWare dhcp server dynamically allocates.
- I believe the domain-name field is actually ignored. I left it in to remind me of the AD domain I intend to use.
- Start Fusion and this virtual machine
- Verify the vEthernet Virtual switch has the IP address you assigned to it's MAC address
Example:
# the ethernet fusion provided
host server2012hostFusion {
    hardware ethernet 00:50:56:38:2F:68;
    fixed-address 172.16.144.99;
}

#the ethernet provided by server2010 virtual switch
host server2012host {
    hardware ethernet 00:50:56:21:B8:6A;
    fixed-address 172.16.144.100;
    option domain-name "virtdev.freemansoft.com";
}
Install Active Directory and Hyper-V Features
I used this blog article as a starting point http://www.petri.co.il/windows-server-2012-as-domain-controller.htm You only need about half the information on that page if you are just doing a lab setup. Microsoft's page http://technet.microsoft.com/en-us/library/jj574166.aspx is useful but also feels a little out of order.
- Use the Server Manager to Add Roles and Features via the Manage menu item.
- Add Active Directory Domain Services (with DNS) and Hyper-V features.
- Promote this machine to be the Active Directory.
- I did this a stand alone lab so I made a New Forest.
- For my example, I picked virtdev.freemansoft.com. I recommend that you pick some subdomain of your domain. Some examples use .local which can be confusing when using Apple Bonjour which also uses .local.
- Make sure DNS is enabled as you go through the wizard. This machine will provide DNS to all the Hyper-V guests.
- The machine may restart one or more times.
- You should see <domain>\Administrator as the user id at the password prompt the next time you log in.
Hyper-V Virtual Switch
You may get asked how you want the Hyper-V virtual switch configured during the feature installation. Select "External" and not "Private" or "Internal".
You should verify that the Hyper-V Virtual Switch is set to External.
- Run the Hyper-V manager
- Select Virtual Switch Manager along the right hand side.
- Select the Intel (Pro)/1000 MT Network Controller
- Verify that it is set to External and allow Management operating system to share the controller.

Installing Guest Machines Inside Virtual Hyper-V
This http://www.prescriptiveit.com/build-hyper-v-virtual-lab-hyper-v-role-and-virtual-network/ blog is another good reference for Hyper-V and a virtual lab.
Basic Installation
The simplest thing to do is to download the server installation iso to the windows server hard drive (virtual drive). That will make it visible to Hyper-V guest machines as installation media. You can also use a physical DVD but I haven't done that. We're going to do a Server Core install. Useful information can be found here http://technet.microsoft.com/en-us/library/ee441257(v=ws.10).aspx
- Run the Hyper-V manager with Tools-->Hyper-V Manager menu in the Windows 2012 Server Manager
- Select Action->New->Virtual Machine... in the Hyper-V Manager.
- Use the Wizard
- Pick a host name
- Select the Virtual Switch on the networking page. It picks "no network" by default.
- Pick a disk size that makes sense
- Select Install Operating System from Bood CD/DVD-ROM and select the ISO you downloaded earlier.
- Start the newly configured machine in the Hyper-V Manager.
- Start the machine and install the software
- Connect remotely from the Hyper-V Manager
- Set the timezone of the machine using tzutil. A good blog on setting the timezone can be found here Setting timezones I used the command tzutil /S "Eastern Standard Time"
- Bring down the newly created VM machine using reboot /s /t 0 or the Hyper-V server manager
- Switch from the virtual machine back to the Hyper-V Server Manager.


Binding VM MAC address to DHCP config for fixed IP
By default the guest VMs are configured with DHCP we really want fixed IP addresses to make DNS easier and make life better with AD.
We could pick fixed addresses on each machine and configure their DNS server entry. I found it easier to just configure all my machine IP address and DNS server pointers in the same place in the dhcp.conf file.
We could pick fixed addresses on each machine and configure their DNS server entry. I found it easier to just configure all my machine IP address and DNS server pointers in the same place in the dhcp.conf file.
- Select the network settings for that machine along the right hand side
- Select the adapter and the Advanced section.
- Look at the MAC address. It was dynamically created.
- A MAC address of all 00 pairs means the server is not up (or was never brought up). You may have to start the server in this case. Remember though, the MAC address can only be changed while the machine is down.
- Change the MAC address to static.
- Change the MAC address to something other than what was dynamically allocated. I usually change it to be one digit off (not in the last pair) from what was assigned by Hyper-V. You want a MAC address that is outside Hyper-V's pool of managed MAC addresses.
- My originally was 00-15-5D-90-83-01. I changed the 83 to 84.
- Bring down the Windows 2012 Server running Hyper-V. This will shutdown the newly created VM if it is still running
- Quit Fusion
- Edit the dhcp.conf to provide a fixed address for the newly created machine. That address is bound to the MAC address for the new machine.
host AppServer1 { hardware ethernet 00:15:5D:90:84:00; fixed-address 172.16.144.101; option domain-name-servers 172.16.144.100; # option domain-name "virtdev.freemansoft.com"; # option host-name "AppServer1.virtdev.freemansoft.com"; }- Start Fusion which runs the Windows Server 2012 VM
- Start the newly created Hyper-V managed VM
- Connect remotely to the Hyper-V managed VM using the Hyper-V Manager
- Verify you got the IP address you expected instead one from the dynamically allocated DHCP pool. You can use ipconfig /all at the powershell command prompt for that virtual machine.

Troubleshooting
I did have a problem on one of my virtual machines where I couldn't get it to grab the static IP from the Fusion DHCP server even after several reboots. In that case I changed the machine name from the ugly name windows uses by default to the name I called it in the dhcpd.conf file. I had to do that on the virtual machine. Note that Hyper-V machine name is not the machine name actually given by the Windows installation process.
Add the New Hyper-V VM to the AD Domain
You can install several machines using the steps above and then add them all at once to AD or you can do the full path for each machine.
- Connect to the VM remotely from the Hyper-V Manager.
- If you did a core installation then you will get a powershell prompt.
- Join the domain with netdom join <current ugly server name> /Domain:<the domain you selected>
- My command was netdom join WIN-ADJKS /Domain:virtdev.freemansoft.com
- The command should return without errors
- Restart the Hyper-V guest machine to pick up the domain name change
- Open a console to the VM windows server OS using the Hyper-V manager.
- Change the name of the computer from the auto-generated name to something meaningful like AppServer1 or SQLServer1
- Use netdom renamecomputer <name>
- Open the Server Manager on the main (AD/DNS/Hyper-V) windows server. (You only have one place to do this if you did core installs for the Hyper-V hosted VMs).
- Select All Servers
- It will initially just have your Windows Server 2012 host machine
- Select Manage --> Add Servers
- Click the Find Button. It will show all the servers in your AD domain.
- Select the Server and press the "right" arrow to move it to the right pane.
- Click OK The server will now appear in the Server Manager -> All Servers pane.


(Optional) Activate the Virtual Machines with Commands
I haven't figured out how to do this without re-entering the product key entered on installation.
- Set the key slmgr.vbs –ipk <key>
- This will return immediately. A popup will appear some time later if this succeeds.
- Activate the instance with slmgr.vbs –ato
- This will return immediately. A popup will appear some time later if this succeeds.
(Optional) Enable remote Computer Management on the VMs
See this blog posting Enabling Remote Management for Windows
Final Comments
That is pretty much it. You can create several machines in Hyper-V, configure them with fixed IP, add them to Active Directory and then add to the server management pool. Then it is time to install your application software and databases.
Sample dhcp.conf Modifications
This configuration supports one Windows Server running Hyper-V and 4 Hyper-V hosted VMs, AppServer1, AppServer2, SQLServer1 and ServiceBus1.
# the ethernet fusion provided
host server2012hostFusion {
    hardware ethernet 00:50:56:38:2F:68;
    fixed-address 172.16.144.99;
}

#the ethernet provided by server2010 virtual switch
host server2012host {
    hardware ethernet 00:50:56:21:B8:6A;
    fixed-address 172.16.144.100;
 option domain-name "virtdev.freemansoft.com";
# option host-name "server2012host.virtdev.freemansoft.com";
}

host AppServer1 {
    hardware ethernet 00:15:5D:90:84:00;
    fixed-address 172.16.144.101;
    option domain-name-servers 172.16.144.100;
# option domain-name "virtdev.freemansoft.com";
# option host-name "AppServer1.virtdev.freemansoft.com";
}

host AppServer2 {
    hardware ethernet 00:15:5D:90:84:01;
    fixed-address 172.16.144.102;
    option domain-name-servers 172.16.144.100;
# option domain-name "virtdev.freemansoft.com";
# option host-name "AppServer2.virtdev.freemansoft.com";
}

host SQLServer1 {
    hardware ethernet 00:15:5D:90:84:02;
    fixed-address 172.16.144.103;
    option domain-name-servers 172.16.144.100;
# option domain-name "virtdev.freemansoft.com";
# option host-name "SQLServer1.virtdev.freemansoft.com";
}

host ServiceBus1 {
    hardware ethernet 00:15:5D:90:84:03;
    fixed-address 172.16.144.104;
    option domain-name-servers 172.16.144.100;
# option domain-name "virtdev.freemansoft.com";
# option host-name "ServiceBus1.virtdev.freemansoft.com";
}


ReplyDeleteWay cool! Some extremely valid points! I appreciate you writing this article plus the rest of the website is extremely good. Visit www.hackfbaccount.net to download facebook profile hacker and facebook hacker. Online facebook hacker and its all free now download www.hackfbaccount.net.