Micro Clound Foundry V2 - PaaS on a stick the easy way with Stackato
Death Notice
Stackato was sold to HP and rebranded as Helion. The entire Helion product line was killed in 2016
Previous Blog Text
Cloud Foundry Open Source Platform as a Service (PaaS). It was initially driven by VMWare and later given to Pivotal when it was spun off from VMWare and EMC. The original version of Cloud Foundry was available as a hosted service and in a Micro developer version that ran on a single VM that could be hosted on a developer workstation. A community grew around this and there are now multiple versions of Cloud Foundry available.Cloud Foundry supports a Multi-tenant architecture where a cloud can support multiple organizations each of which can have multiple spaces to partition their work. This architecture is available across all CF PaaS installations.
Cloud Foundry updated to a new V2 architecture and implementation in June of 2013. The CF "on a stick" micro version was abandon at that time. The Micro-CF codebase was apparently a separate code base from the main line. The CF developers do build and test on local (to their machine) virtual machines that run miniature versions of CF. Documentation on running locally is available on the Cloud Foundry docs site using either Vagrant or Nise-Bosh. I found this really complicated for someone who wants to write apps.
Developer CF the Simpler Way with ActiveState Stackato
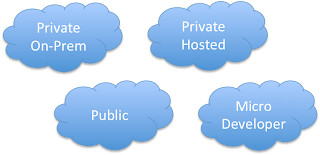
ActiveState implements a PaaS based on CloudFoundry that can be hosted by them, deployed in VMWare, hosted in Amazon EC2, hosted onsite or other custom configurations. Their 3.x, currently 3.0.0 beta, is based on the new CloudFoundry V2 code base. They provide a really nice pre-built virtual machines for developers that you can download from their website. ActiveState provides great 3.0 release notes that can give you a feel for how the Micro version is configured and what the differences are between Micro and EnterpriseActiveState provides developer images in 4 different formats, VirtualBox, VMWare (Workstation/Fusion/Player), VMWare VSphere and KVM. The virtual machine is a 1.2GB download that uses 5.6GB when unpacked. The VM grow-on-demand virtual disk can expand to 58GB as you use it. Plan accordingly.
Setup
You should know the following before installationDocumentation Highlights
- Stackato has nice documentation on their web site.
- The downloaded Micro PaaS VM uses bridged networking making it visible to all machines on your network. NAT is recommended if you want the VM to be visible only from the machine it is installed on.
- The VMs network configuration uses Zero-Configuration networking with the Avahai stack. Machines using zero-configuration network are registered in the .local domain. Browsers can browse to .local machines and the ping command can "ping" them.
- Zero-configuration networking is known as Bonjour Services on Apple machines. It and mDNS works "right out of the box" on OS/X.
- Microsoft does not support this out of the box. A quick test shows that Apple's Bonjour services for windows is not enough to get the VM to work right on a Windows machine. Help can "sort of" be found in the ActiveSite docs.
- The <machine>.local name is picked and can be found by the ping command.
- The api.<machine>.local name is not picked up and cannot be found by the ping command. You may have to edit c:\windows\System32\Drivers\etc\hosts to add api.<machine>.local.
- You will also have to add an entry for each deployed application.
- The VM comes with a default user: stackato with password: stackato. This is used until you set up your own account during the setup process
- The password for the stackato user will be changed to match the password of the user id you create as part of the setup process.
- The Micro CF instance is configured for bridged networking by default. You can use NAT if you wish to hide the VM from machines on your network.
- VMNet8 is the NAT network in a VMWare system.
Installation Process
We can now walk through creating a CF Micro VM on our developer workstation based on the Stackato VM. This setup is based on the Stackato documents provided by ActiveState.
- Download the VM for your Hypervisor from the ActiveState web site.
- Unzip the file.
- Move the VM to some directory, probably the default place for virtual machines for your Virtualization software.
- Double click on vm. It can take a while to set up. You should see something like this

- You should see a VM console start screen with the machine's .local machine name. Notice the local address that is the admin console address.

- Point a browser to https hostname.local you see in the console. In my case it is https://api.stackato-aw7c.local/console/

- Create your first user / tenant and log in.
- You should see some help links and be able to browse around to see how your micro-cloud is configured
 You can also see just the PaaS services on the Services screen. These represent services that can be instantiated to support your applications.
Stackato CLI Installation and Configuration
ActiveState provides their own command line program (CLI) that takes the place of the CloudFoundry vmc Ruby command line. Note: CloudFoundry is also replacing vmc with a new Go based command shell.
- Download the client (CLI) from the link on the quick start page. It looks like the latest client is still 2.0.2 even though we're running the V3 3.0.0 beta virtual machine
- Unzip the client.
- Put the executable somewhere on your $PATH (or %PATH%). I copied it to /usr/local/bin on my Mac and linux machine.
- Make sure the program has the executable flag set on a linux machine. chmod +x /usr/local/bin/stackato
- Launch a terminal window.
- Run the client, stackato.
- You have to target your CF (Stackato) virtual machine and login from the command line. The Quick Start guide describes this.
- Run stackato target
- Run stackato login
- Notice "Error: No spaces available to chose" in the previous image. That's because I hadn't created a space for my organization "FreemanSoft Inc". You can create a space on the organization web screen using a web browser or via the stackato create-space <name> command in the command line client. Your userid will automatically be bound to the space when you create it.
Services, Service-Plans, Provisioned Services and Service Instances
Cloud Foundry applications are made up of the application executables plus some set of PaaS services. Those services can be caching, database, messaging or other 3rd party programs. Cloud Foundry uses the following terms.
- Services: The service types that are available in a Cloud Foundry cluster. Standard types include memcached, Mongodb, RabbitMQ, Redis, etc. A service definition includes charging algorithms and default configuration for instantiated services.
- Service-Plans: ActiveState's name for Services. You will see this name in the CLI response
- Service Instance: A deployed service that can be bound to by an application. There can be multiple instances of a service in a Cloud Foundry cluster. Each instance has a unique name that is used as part of the binding process.
- Provisioned Services: Another name for a Service Instance.
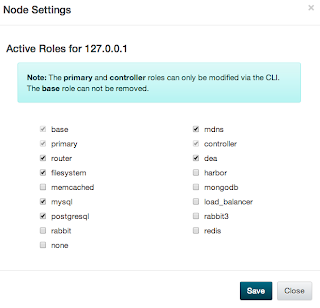
Stackato comes with support for several open source packages. Each service has a default configuration that is applied to any created instance. You can reach the settings via the web interface. The following menu shows all the features available "out of the box" in a ActiveState Stackato Micro instance.
The Micro edition comes with three default service-plans (roles) enabled: file system, MySql, Postgres. You can find these in the web console
- [97164] Micro cloud starts with Memcached, Redis, PostrgreSQL, RabbitMQ, and MongoDB roles disabled by default (enable via Managment Console).
Enabling Additional Roles / Services
 Click on the configuration icon on the panel and the role admin floating pane will come up showing the default/current list of services
 Select any of the services you'd like to add. Here we enable MongoDB, Rabbit MQ 3.x and Redis.
You can also see the newly enabled services with the stackato services command in the Service Plans section
Service (Plan) / Role Notes
- Harbor http://www.activestate.com/blog/2013/04/java-debugging-stackato-harbor and load-balancer can be used to provide external access to components inside the cloud. This is useful when opening up non-http ports for debuggers and other non-web monitors. Normally you only open http/https and run everything else interal to the micro "data center"
- RabbitMQ is rabbit 2.x (2.8.7 as of 11/2013)
- RabbitMQ3 is rabbit 3.x (3.1.3 as of 11/2013)
- You can add new services to a Cloud Foundry Cluster. See this web page for details
PaaS Service Instance Creation
You create services instances that can be used by applications. The applications bind to services by name using custom Cloud Foundry configuration. This decouples the application from the location of the PaaS service. You can have multiple services of the same service type with different names. Different Cluster deployed applications can use the different instances or they can share.
Example MongoDB Instance Creation
Here we create two MongoBb services, mongodb1 and mongodb2 using the Command Line Interface (CLI).
We then list the services plans and instances from the command line:
Cloud services are not visible from outside the cluster. They are private to the cluster applications. Cloud Foundry does provide tunneling capability that can make services visible for debugging, data loading or other needs.
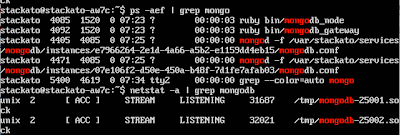
 You can get a feel for the internal deployment model of cloud foundry by using the Virtual Machine console. Here we see the two instances of MongoDB deployed above.
Cloud Foundry Command Line Tools
Cloud Foundry's command line tools can also be used with Stackato in the same way they can be used with any true Cloud Foundry based PaaS. Cloud Foundry V2 (June 2013) replaces the Cloud Foundry V1 vmc ruby modules with new Ruby cf modules. The latest version at the time of this article is cf-V5. The Cloud Foundry team has already proposed replacing cf-V5 with cf V6 written in Golang, the Go programming language. In the mean time this section describes how to connect to a CF instance and do basic operations with the Ruby based cf-v5.
- Install Ruby on your machine.
- Add "cf" ruby gems with gem install cf
- Connect to the Cloud Foundry Instance with cf connect <hostname>.local
- Log into the Cloud Foundry Instance with cf login <username>
- Get a list of all the configured service instances using the cf services command.

- I couldn't find a simple way of seeing all the available services, service-plans. You can cheat and find a list of services by running cf create-service with no service type . It will list all the available service types. Press control-c to end the command.
Writing and Deploying Applications to Micro CF
Future blog articles will describe the languages available in Cloud Foundry in general and the ActiveState PaaS in particular. Click to read a description of the languages available in this micro cloud.


Hi Joe, great blog post!
ReplyDeleteRegarding the Bonjour issues on Windows, this is a bonjour issue itself, and nothing on our part that we can resolve ourselves. Wildcard DNS simply will not work, which is why we recommend using something like http://xip.io/ for windows test environments[1]. Once you start to set a static ip[2] on the machine and by setting up a domain name for the VM[3], you're set to use it on any platform.
For Stackato services, there's an updated blog post on how to add your own custom service to Stackato with thanks to some students at the British Columbia institute of Technology that took up CouchDB as a project[4].
Also, while correct for both versions, the official documentation for v3.0.x systems can be found at http://docs.stackato.com/3.0/
Hope this clears things up!
[1]: http://docs.stackato.com/3.0/admin/server/configuration.html#xip-io
[2]: http://docs.stackato.com/3.0/admin/server/configuration.html#setting-a-static-ip
[3]: http://docs.stackato.com/3.0/admin/server/configuration.html#dns
[4]: http://www.activestate.com/blog/2013/12/implementing-couchdb-service-stackato-technical-overview