Importing a bootcamp partition into VMWare Fusion when it has Hyper-V enabled.
This is quick note on importing a Windows 8 or Server 2012 BootCamp partition that had Hyper-V hypervisor enabled.
By default, you cannot have Hyper-V booted inside of Fusion because of hardware vitualization conflicts. You know you have this problem if you see the following messages in the guest machine's window in VMWare Fusion.
You're supposed to be able to do this via the Fusion 6 GUI but that did not work for me. This section is here to provide breadcrumbs for future searchers with this problem.
By default, you cannot have Hyper-V booted inside of Fusion because of hardware vitualization conflicts. You know you have this problem if you see the following messages in the guest machine's window in VMWare Fusion.
Your PC ran into a problem and needs to restart. We're just collecting some error info, and then you can restart. (100% complete)
If you'd like to know more, you can search online later for this error: SYSTEM_THREAD_EXCEPTION_NOT_HANDLED (winhv.sys)
Edit the Fusion VMX configuration file directly.
You can fix this by editing the vmx file directly.- Shutdown Fusion
- Find your Virtual Machine definition. Navigate to /users/<username>/Library/Application Support/VMWare Fusion/VirtualMachines/Boot Camp.
- Right Click on the Boot Camp package and select Show Package Contents
- Edit the file that ends in .vmx using TextEdit or your default file editor
- Add a line at the end containing
hypervisor.cpuid.v0 = "FALSE" - Save the file.
- Launch Fusion
- Run the imported BootCamp virtual machine
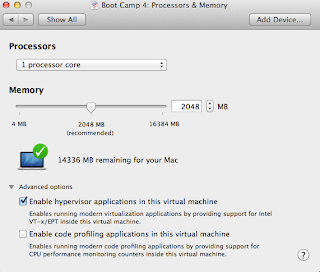
Using the GUI
- Bring down the crashed imported Boot Camp virtual machine
- Edit the Virtual machine settings via the menu Virtual Machine Settings --> Processors & Memory --> Advanced
- Check "Enable hypervisor applications in this virtual machine"
- Close the settings
- Restart the virtual machine


Comments
Post a Comment