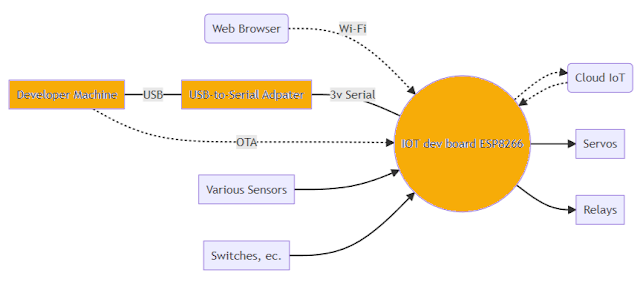
MicroPython - Iterative development process with an ESP8266
MicroPython lets you create Python-based modules that can be built on top of the frozen base Python image. You can upload python (py) files to the device's file system where they can be run separately and then called as part of the final product. Many teams can just use the existing Python capabilities and the bundled C modules without having to create c code of their own.
There is a set of problems that are not real-time constrained and a class of relatively inexpensive IoT devices that are just spacious enough to support modular software and incremental updates. Micropython makes it easy for the average developer to build modular software and incrementally develop and update components.
Developing software for IoT devices can be painful because there is no way to debug, step through or instrument code. The code runs from beginning to end. It is debugged by looking at external symptoms or serial port output. Software is downloaded to the device as a monolithic unit because there is no easy way to incrementally update the device. This leads to long Edit / Download / Restart / Evaluate cycles. Real-time systems can be even harder because race conditions can be difficult to tease apart.
Organizing MicroPython Code
- Create Python Code in Functions and classes.
- Put even your main loop into a function like main()
- Dependency inject as much as you can into the class configuration.
- Pull configuration constants out of the modules into a configuration class.
- Make it easy to run functions from the REPL
- Read the user input (your Python commands).
- Evaluate your code (to work out what you mean).
- Print any results (so you can see the computer’s response).
- Loop back to step 1 (to continue the conversation).
Youtube Talk
Toggle an IO pin example
Get a remote string via HTTP GET call example
This example isn't done yet. It reads and prints the response of an HTTP GET call. Additional work needs to be done but the code is testable outside of any other structure
import socketdef http_get_print(url): _, _, host, path = url.split("/", 3) addr = socket.getaddrinfo(host, 80)[0][-1] s = socket.socket() s.connect(addr) s.send(bytes("GET /%s HTTP/1.0\r\nHost: %s\r\n\r\n" % (path, host), "utf8")) while True: data = s.recv(100) if data: print(str(data, "utf8"), end="") else: break s.close()
The test code in the REPL would look something like the following. Again the REPL ">>>" prompt was removed to make it easier to copy/paste.
from httpget import http_get_printhttp_get_print("http://micropython.org/ks/test.html")
Structure the main.py for testing
http_get_print("http://micropython.org/ks/test.html") toggle_pin(2, 500, 2)
Another nice thing about this structure is that it documents the steps required to run the various components. The main() is simple and it is easy for me to copy/paste these few lines into the REPL prompt window to verify each step.
Developer Experience
Organize your code
- Put configuration in its own file that can be used across modules
- Organize code into functions and classes.
- Write functions and classes to be easy to run from the REPL
- Organize code so that the main.py is only a few lines long.
- Configure startup to call a function in main.py
The loop
- Work on a single module at a time.
- Edit the module/code, in an IDE.
- Open an rshell prompt from a terminal sitting in your code directory.
- Upload the module to the device /pyboard partition using rshell
- Drop into REPL
- Run any initialization code required. EX: Bring up the WIFI connection.
- Run the module standalone to verify functionality
- Stop the module if it is in a loop with control-c
- Drop out of REPL to upload the next source file with control-x
- Repeat this process one module at a time
- Update the main loop to invoke the developed modules in sequence.


Comments
Post a Comment