Cloud and Software Architecture, Soft skills, IOT and embedded
Working with state in MicroPython Timer callbacks
Get link
Facebook
X
Pinterest
Email
Other Apps
MicroPython supports hardware and software timers with callbacks. Timers can be configured as single-shot or periodic events meaning they trigger only once or on a periodic basis. You can bind a Python function to the timer running in either mode. Your function will receive a callback whenever the timer rolls over or expires.
Hardware timers are bound to the actual CPU timers and typically correlate 1:1 to hardware devices. This means the hardware timer configuration is hardware specific to the size and capabilities of the hardware timers. In general, you can only tie one callback to each timer because the callback is bound to the hardware timer interrupt handler.
MicroPython also supports software timers. Software timers are the only option on CPUs like the ESP8266 where hardware timers are scarce or are dedicated to other functions. They have the same callback/handler restrictions as hardware timers.
Timers are started with an init() call. You can specify the timer behavior and callback function as part of the init() call. The callback function() will be invoked at the end of every timer period.
Timer.init(*, ..., callback, ...)
Some timers also have an API that lets you set or change just the callback function with a Timer. callback(callback_func). Timer APIs may vary slightly by IoT device type so check the documentation for your device.
Callback Parameters
MicroPython timer callbacks only include a reference to the timer itself. No callback-specific data other than the timer reference is made available as part of the invocation.
defcallback_handler(t):
This means that using the exact same bare function as a callback across timers has no way of maintaining different states for each timer. Ex: Each timer is bound to different I/O pins.
A better alternative is to have separate handler instances for each timer. An Object-Oriented pattern for this is described below.
Timer rollover callbacks execute as an interrupt handler
No memory should be allocated as part of the callback function invocation.
Timer callbacks are invoked by interrupt handlers while the primary Python thread is idle. This is probably the reason that the MicroPython timer callback signature is different from the Thread.Timer callback signature in regular Python.
You are restricted in what you can do in an interrupt handler with respect to memory allocation. This is called out on many of the MicroPython hardware-specific timer documentation pages. Ex: pyb timer callback docs
Note: Memory can't be allocated during a callback (an interrupt) and so exceptions raised within a callback don't give much information
Make sure that you have pre-allocated any memory required for callbacks. The I/O pin toggling callback example shown below allocates no memory when invoked.
Keep the code as short and simple as possible.Avoid memory allocation: no appending to lists or insertion into dictionaries, no floating point.
Consider using micropython.schedule to work around the above constraint.
Where an ISR returns multiple bytes use a pre-allocated bytearray. If multiple integers are to be shared between an ISR and the main program consider an array (array.array).
Where data is shared between the main program and an ISR, consider disabling interrupts prior to accessing the data in the main program and re-enabling them immediately afterwards (see Critical Sections).
Allocate an emergency exception buffer (see below).
Create a web server that has a reference to the timer and a callback function
The web server responds to requests to start and stop the timed behavior which results in init()/deinit() calls for the timer
When running, the Timer invokes the callback function whenever the timer period is exhausted. The callback in this case just toggles the state of an LED.
The example can start and stop a timer at will by invoking init()/deinit(). The timer invokes the callback function provided in the init() call whenever a timer period expires. The callback function processes whatever it needs to do. Periodic timers then reset the period count setting up the next callback.
Note: We can change the callback function bound to the timer every time we init() it.
This entire process happens essentially as background work while the web server in the example is idle waiting for requests.
Holding State in Global Variables
Callback functions() only receive the timer itself as a parameter. They can't allocate memory and they don't get passed in any other state. It is best to write callback functions so that they don't require any persistent state or state across calls but this is not always possible. Ex: you wish to send an MQTT message to the cloud on a periodic basis. You would need the connection information for the target URL.
Any required persistent state must be allocated outside of the function definition. The function definition must be able to reference that external memory. We don't know what thread the function will run in and should assume that it may be in a different context than the primary execution loop.
The example below declares a variable periodic_target I/O pin outside the function so that it maintains its state across callbacks. The variable is described as global inside the function so that the code knows to use the externally declared value instead of creating one that exists only for the function invocation.
Global variables are generally frowned upon and can create unexpected coupling. They are also a problem if we wish to use the same function for multiple timers. Ex: flashing different LEDs at different rates bound to timers with different periods.
The function described above can be passed as a callback by reference. The line below shows the function being passed in as a callback handler.
We need a reliable way of providing persistent storage to the event handler across invocations. Python supports object-oriented programming. We can define an object that has multiple functions/methods on it. Then we can create an instance of that object, or struct, with a state local to just that instance. The TogglePin example below is initialized with the hardware pin we are going to toggle. All references to functions on that object have access to that pin. This means that toggle_pin_callback() has access to the _periodic_target of its instance.
classTogglePin:
"""A sample target class that gets invoked as a timer callback"""
The pin is bound to a specific TogglePin instance. We can create as many TogglePin instances as we wish all bound to different I/O pins. Each instance has its own private state.
Check the docs on how to schedule work rather than doing long running task inside the callback.
Timer Callbacks and Interrupts and the REPL
Interrupt handlers continue to run after you break into the REPL. You can easily see this if you have a Timer callback running when you open the REPL. The main program stops running but the callbacks continue to be invoked until the timer is terminated with deinit()
I do a lot of my development and configuration via ssh into my Raspberry Pi Zero over the RNDIS connection. Some models of the Raspberry PIs can be configured with gadget drivers that let the Raspberry pi emulate different devices when plugged into computers via USB. My favorite gadget is the network profile that makes a Raspberry Pi look like an RNDIS-attached network device. All types of network services travel over an RNDIS device without knowing it is a USB hardware connection. A Raspberry Pi shows up as a Remote NDIS (RNDIS) device when you plug the Pi into a PC or Mac via a USB cable. The gadget in the Windows Device Manager picture shows this RNDIS Gadget connectivity between a Windows machine and a Raspberry Pi. The Problem Windows 11 and Windows 10 no longer auto-installs the RNDIS driver that makes magic happen. Windows recognizes that the Raspberry Pi is some type of generic USB COM device. Manually running W indows Update or Upd...
We have Verizon FIOS with cable TV service. I've never really paid attention to how the Verizon side is wired up until Verizon recently upgraded my FIOS router and tuner box. After breaking my TV tuner by disconnecting an " unneeded" connection, I created yet another diagram of how the FIOS connections work. This is a basic wiring diagram of the house network missing a bunch of devices. Verizon ONT The Verizon optical network terminal converts the optical connection into TV and network standard connections. The ONT is actually two boxes in my situation. One outside connects to the optical and one inside converts something into an Ethernet WAN connection. This results in me connecting a TV COAX and an Ethernet WAN. Verizon TV Tuner The Verizon TV tuner decodes and decrypts TV data that it receives over coax. The TV tuner must talk back to Verizon for any video control operations. It could talk back wireless, over an extra ethernet connection to back over th...
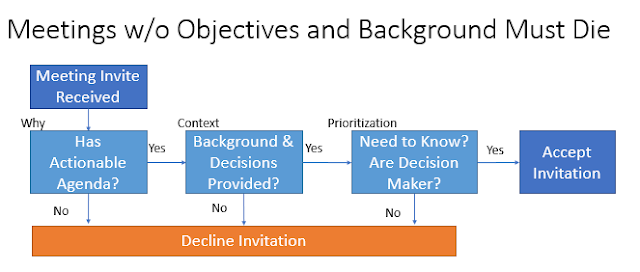
Meetings can be crazy expensive and demoralizing when they burn hours without generating results. Good design sessions, decision-making sessions problem-solving sessions start with the pre-meeting work. An empty meeting invitation is useless and a time drain. Invitees should decline them. A meeting without any context about the problem or prior decisions is going to fail or be way more expensive than it needs to be. Invitees should decline them. Invitations should always state the purpose, contain an agenda, describe the expected decisions that need to be made, and contain background content. Everyone has to do their part. Organizers must meet some minimum bar for meetings to have any value. Attendees must read the invitations and the background materials. There will be super secret projects where no agenda and no supporting information are provided. Those should be the exception rather than the rule. Click to Enlarge Productive meetings have inputs, proces...


Comments
Post a Comment