Running timed background tasks on IoT devices the easy way with MicroPython
MicroPython is single-threaded but it turns out it is easy to have it do periodic tasks while doing other work like waiting on network requests when running a web server. Here we demonstrate a simple wrapper class that makes it trivial to trigger actions with a timer while at the same time accepting web requests.
Everything discussed here runs on a simple ESP8266 IOT board. The code is on Github https://github.com/freemansoft/ESP8266-MicroPython
Web Server gives direct control and enables Timed Events
The IoT device runs a small web server written in MicroPython. It coughs up a web page with a series of device controls. This image contains a direct servo pin control and a timed operations control. The latter basically causes some action to be taken on a regular basis, in this case flashing an LED. This happens continually while the system waits for and receives HTTP requests on this UI. We can move the servo around while the light flashes without any complicated wait loops.

The web server runs continually accepting requests. It directly communicates with the I/O subsystem except in cases like this timed behavior where it talks to a controller of some type.
Video
See this discussed on YouTube https://youtu.be/fxV6mqHWPfA
A webserver on the ESP8266 and background activity
Our IoT devis is an ESP8266 board connected to various servos, and LEDs It runs an onboard web server that manipulates the connected devices based on the web submissions. The same system has a Periodic Operator hooked to the web action handlers. This lets the action handlers enable and disable the periodic operation without understanding any of the mechanics of timers, interrupt handlers, and other advanced topics.

Control Flow
I wanted to inject all dependencies into my Python-based web server so that it only handles behavior and no initialization. Our setup code in main.py creates a Timer. It then creates a Periodic Operator passing in the timer and the callback function that must be able to handle all of the steps required for this periodic operation.
 In mainline logic, the web server, in this case, can start and stop the periodic operator. That starts/stops the injected timer which in turn starts and stops any associated processing. For the demo, this starts and stops a blinking LED.
Simplifying behavior with a Periodic Operator wrapper
I created a wrapper class that encapsulates task control and the work itself. This makes it simpler to pass a single component wherever this timed task needs to be controlled. Note that there are really only two post-initialization behaviors: start() and stop()
class PeriodicOperator:
"""A construct that binds a timer to a function.
PeriodicOperator(Timer(-1), ms, function)
"""
def __init__(self, timer, period, callback):
self._timer_ = timer
self._period_ = period
self._callback_ = callback
self._isRunning_ = False
def __str__(self) -> str:
return "%s is running: %d" % (self._timer_, self._isRunning_)
def start(self):
self._timer_.init(period=self._period_, callback=self._callback_)
self._isRunning_ = True
def stop(self):
self._timer_.deinit()
self._isRunning_ = False
def running(self):
return self._isRunning_
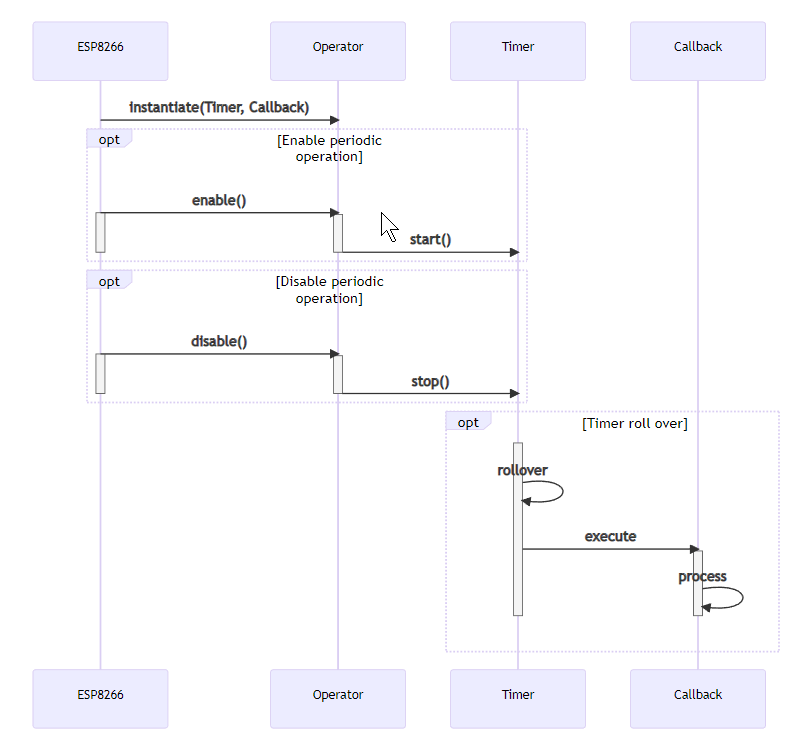
In Sequence
Controlling and using timed actions really has really 3 stages.
- Instantiation and configuration of the Operator.
- Activity control, in this case, start and stop
- Executing the callback business functionality whenever the timer triggers an event.
The following diagram shows the simple calling sequence for each phase. Note that this diagram shows neither the Timer configuration nor the callback definitions.
Video Walkthrough
Modification History
2022 12 Created


Comments
Post a Comment